11 Spooky Halloween Bracelet Ideas
Are you ready to get crafty and add some spooky flair to your wrist? Halloween bracelets are the perfect way to celebrate the season.

They’re fun, festive, and let you show off your love for all things creepy, cute, or downright magical. Whether you’re making them for yourself, your kids, or as gifts, I’ve got you covered with 11 unique bracelet ideas.
I’ll walk you through each one with clear steps, material lists, and tips to make them your own. No matter your skill level, you’ll find something here to spark your creativity.
Let’s dive into the spooky fun!
Table of Contents
The 11 Halloween Bracelet Ideas
Here’s the heart of the article: 11 Halloween bracelet ideas to bring your spooky vision to life.
Each one includes a description, materials (with budget estimates and eco-friendly options), step-by-step instructions, customization ideas, difficulty level, estimated time, and tips for styling or gifting.
I’ve kept everything simple so you can follow along easily, even if you’ve never made jewelry before.
1. Pumpkin Charm Bracelet

Nothing says Halloween like pumpkins! This bracelet features mini pumpkin charms for a cozy, harvest vibe. It’s bright, cheerful, and perfect for autumn lovers.
Materials:
- Orange pumpkin beads or charms ($2–5)
- Green leaf charms ($1–3)
- Chain or elastic cord ($1–2)
- Clasps or jump rings ($1)
- Eco-friendly option: Use orange buttons or painted pebbles for pumpkins.
- Budget: $5–10
Steps:
- Cut a piece of chain or elastic cord to fit your wrist (about 7 inches for adults).
- String on orange pumpkin beads, spacing them evenly.
- Add green leaf charms between pumpkins for a pop of color.
- Secure the ends with a clasp (for chain) or knot (for elastic).
- Check the fit and trim any excess cord.
Customizations: Make it glow with glow-in-the-dark beads. Add letter beads to spell out your name or “BOO.”
Difficulty/Time: Beginner; 15–20 minutes
Styling/Gifting: This bracelet pairs perfectly with cozy sweaters or fall dresses. It’s a great gift for teachers or kids’ party favors. Hand them out at a pumpkin patch outing for extra charm!
2. Ghost Beaded Bracelet

Who doesn’t love a friendly ghost? This bracelet has cute white ghost beads floating on a black background, perfect for a playful Halloween look.
Materials:
- White polymer clay for ghost shapes ($2–4)
- Black beads ($1–3)
- Jewelry wire or elastic cord ($1)
- Eco-friendly option: Repurpose white buttons or bottle caps for ghosts.
- Budget: $3–8
Steps:
- Mold small ghost shapes from white polymer clay (think teardrop with eyes).
- Bake the clay per package instructions (usually 15 minutes at 275°F).
- Let ghosts cool completely.
- String black beads onto wire or elastic, adding a ghost every few beads.
- Tie off or crimp the ends securely.
Customizations: Vary ghost sizes for a quirky look. Add tiny LED lights for a glowing effect at night.
Difficulty/Time: Beginner; 20–30 minutes
Styling/Gifting: Wear this to a haunted house or ghost tour—it’s a conversation starter! Gift it to friends with a note saying, “You’re boo-tiful!”
3. Spider Web Bracelet

Feeling a bit creepy? This spider web bracelet uses wire or thread to create delicate webs, with bead spiders crawling along. It’s eerie but elegant.
Materials:
- Silver wire or embroidery thread ($2–4)
- Black beads for spiders ($1–3)
- Stretch cord ($1–2)
- Eco-friendly option: Use old yarn or fishing line for webs.
- Budget: $4–9
Steps:
- Cut a stretch cord to fit your wrist.
- Use silver wire or thread to weave a small web shape (think starburst pattern).
- String the web onto the cord.
- Add black bead spiders (use small beads for bodies, tiny ones for heads).
- Secure the cord with a knot or crimp bead.
Customizations: Try colored thread for vibrant webs, like purple or green. Add dangling spider charms for extra spook.
Difficulty/Time: Intermediate; 25–35 minutes
Styling/Gifting: This one’s perfect with a witch costume or dark nail polish. Gift it at office Halloween parties—it’s a chic, creepy touch.
4. Bat Wing Bracelet

Bats are Halloween classics! This bracelet uses bat-shaped pieces linked together for a bold, nocturnal vibe.
Materials:
- Black felt or faux leather for wings ($2–5)
- Jump rings ($1–2)
- Chain ($2–5)
- Eco-friendly option: Cut wings from old black T-shirts.
- Budget: $6–12
Steps:
- Cut bat wing shapes from felt or leather (about 1 inch wide).
- Poke small holes at the top of each wing.
- Link wings together with jump rings.
- Attach the chain to both ends with a clasp.
- Test the fit and adjust as needed.
Customizations: Paint wings with metallic silver for shine. Add red bead eyes for a vampire bat twist.
Difficulty/Time: Beginner; 15–25 minutes
Styling/Gifting: Stack this with silver bangles for a bold look. It’s great for teens or anyone into goth style. Gift it to a friend who loves Batman!
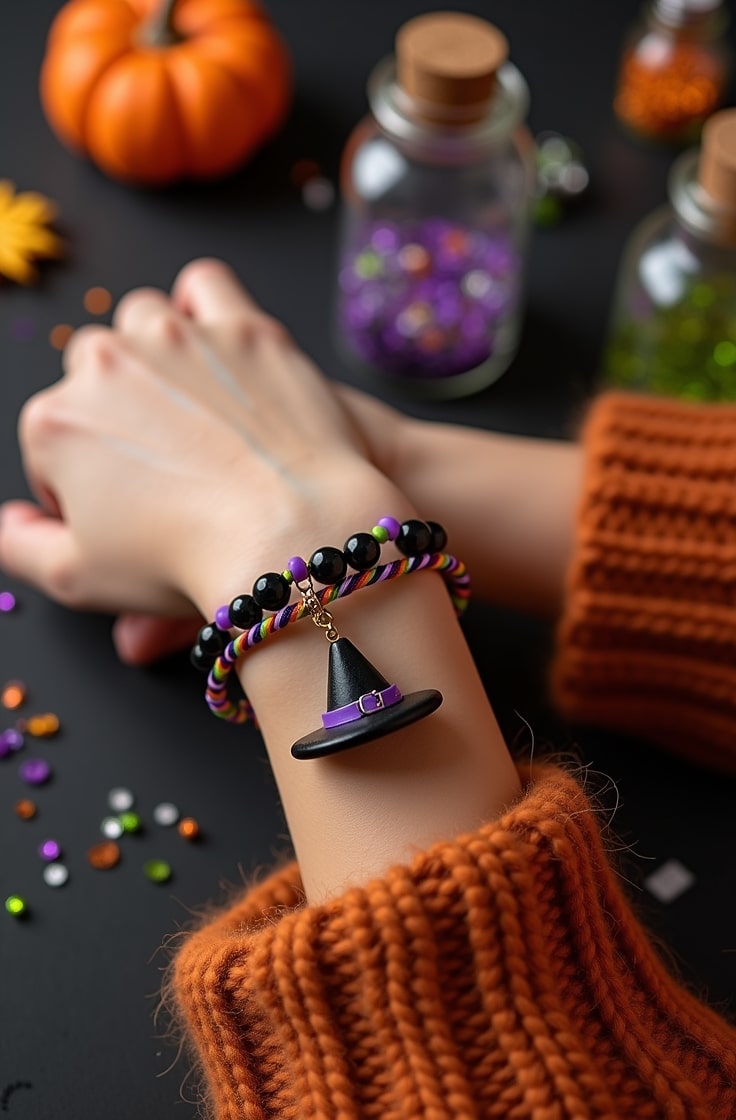
5. Witch Hat Bracelet

Channel your inner witch with this bracelet featuring tiny witch hat charms on a colorful base. It’s magical and fun!
Materials:
- Black cone beads for hats ($2–4)
- Ribbon or mini buckles ($1–3)
- Purple or green elastic cord ($1–3)
- Eco-friendly option: Use black bottle caps for hats.
- Budget: $5–10
Steps:
- Cut elastic cord to fit your wrist.
- String on black cone beads to act as witch hats.
- Add tiny ribbon buckles or beads between hats for detail.
- Tie a secure knot and hide it inside a bead.
- Check the stretch and trim excess cord.
Customizations: Add broomstick or potion bottle charms. Use glittery beads for extra sparkle.
Difficulty/Time: Beginner; 10–20 minutes
Styling/Gifting: Wear this to a witch-themed party or book club meeting. It’s a thoughtful gift for fans of Harry Potter or Sabrina.
6. Candy Corn Bracelet

Candy corn is a Halloween must! This bracelet layers orange, yellow, and white beads to mimic the sweet treat.
Materials:
- Orange, yellow, and white beads ($1–4)
- Stretch cord ($1–2)
- Toggle clasp ($1)
- Eco-friendly option: Use painted wooden beads.
- Budget: $2–7
Steps:
- Cut stretch cord to fit your wrist.
- String beads in candy corn order: white, orange, yellow.
- Repeat the pattern until the bracelet is full.
- Attach a toggle clasp or knot securely.
- Test the stretch and trim any extra cord.
Customizations: Mix in candy-shaped charms, like lollipops or gummy bears. Add glitter beads for a sugary sparkle.
Difficulty/Time: Beginner; 10–15 minutes
Styling/Gifting: This is perfect for trick-or-treating or casual fall outings. Make a bunch for classroom treats or kids’ parties.
7. Skeleton Bone Bracelet

Get bony with this bracelet! White bone-shaped beads on a dark cord create a spooky, undead look.
Materials:
- Bone-shaped beads or charms ($2–4)
- Black cord ($1–3)
- Crimp beads ($1–2)
- Eco-friendly option: Carve bones from white plastic lids.
- Budget: $4–9
Steps:
- Cut black cord to fit your wrist.
- String bone beads, spacing them with black beads if desired.
- Add a skull charm at the center for flair.
- Use crimp beads to secure the ends.
- Check the fit and adjust the cord.
Customizations: Use phosphorescent beads for a glow-in-the-dark effect. Add red beads for a bloody twist.
Difficulty/Time: Intermediate; 20–30 minutes
Styling/Gifting: This pairs great with pirate or zombie costumes. Gift it to horror movie fans—they’ll love the creepy vibe.
8. Frankenstein Monster Bracelet

Bring Frankenstein’s monster to life with green beads and bolt charms. It’s quirky and perfect for monster fans.
Materials:
- Green clay or beads ($2–5)
- Silver bolt charms ($2–4)
- Jewelry wire ($1–2)
- Eco-friendly option: Use green bottle caps for heads.
- Budget: $5–11
Steps:
- Mold green clay into small monster head shapes (or use green beads).
- Bake clay per instructions if needed.
- String heads onto wire, adding bolt charms on either side.
- Crimp or knot the wire to close the bracelet.
- Ensure it fits comfortably.
Customizations: Add thread “stitches” for a scarred effect. Use black beads for hair details.
Difficulty/Time: Intermediate; 25–35 minutes
Styling/Gifting: Wear this to a Frankenstein-themed movie night. It’s a great gift for sci-fi or classic horror fans.
9. Vampire Fang Bracelet

Sink your teeth into this one! Red and white fang charms on a dark chain give off serious vampire vibes.
Materials:
- Fang pendants ($2–5)
- Red crystal beads ($2–4)
- Black chain ($2–3)
- Eco-friendly option: Use white plastic scraps for fangs.
- Budget: $6–12
Steps:
- Cut chain to fit your wrist.
- Attach fang pendants with jump rings.
- Add red crystal beads between fangs for a bloody effect.
- Secure the chain with a clasp.
- Test the fit and adjust.
Customizations: Add tiny cape charms or blood-drop beads. Use glow-in-the-dark fangs for extra creep.
Difficulty/Time: Beginner; 15–25 minutes
Styling/Gifting: Pair this with a vampire cape or red lipstick. Gift it to fans of Twilight or Dracula for a fang-tastic surprise.
10. Mummy Wrap Bracelet

This bracelet looks like a mummy’s bandages, complete with peeking googly eyes. It’s spooky yet adorable!
Materials:
- White fabric strips or yarn ($1–3)
- Googly eyes ($1–2)
- Glue ($1–3)
- Eco-friendly option: Use old white sheets for wraps.
- Budget: $3–8
Steps:
- Cut a base cord or bracelet to fit your wrist.
- Wrap white fabric strips or yarn tightly around the base.
- Glue googly eyes at random spots for a “peeking” effect.
- Secure the fabric ends with glue or a knot.
- Let it dry and check the fit.
Customizations: Add pyramid charms or stain the fabric with tea for an aged look. Use colored eyes for fun.
Difficulty/Time: Beginner; 20–30 minutes
Styling/Gifting: This is perfect for Egyptian-themed costumes. Gift it to history buffs or kids who love mummies.
11. Black Cat Bracelet

Black cats bring Halloween luck! This bracelet features cat silhouettes with yellow eye beads for a sleek, superstitious charm.
Materials:
- Black cat charms ($2–4)
- Yellow beads for eyes ($1–3)
- Elastic cord ($1–2)
- Eco-friendly option: Cut cat shapes from black plastic lids.
- Budget: $4–9
Steps:
- Cut elastic cord to fit your wrist.
- String black cat charms, alternating with yellow beads.
- Tie a secure knot and hide it inside a bead.
- Test the stretch and trim excess cord.
- Ensure it fits comfortably.
Customizations: Add whisker details with thin wire. Include paw print beads for extra cuteness.
Difficulty/Time: Beginner; 10–20 minutes
Styling/Gifting: Wear this with a witchy outfit or cat ears. It’s a purr-fect gift for cat lovers or anyone superstitious!
Practical Tips and Troubleshooting
Crafting isn’t always smooth sailing, but I’ve got your back. Here are some common issues and fixes:
- Loose beads: Double-knot elastic cords or use crimp beads for chains.
- Wrong size: Measure your wrist before starting (add 1 inch for comfort).
- Running out of materials: Buy in bulk or repurpose household items like buttons or yarn.
To save money, check dollar stores or thrift shops for beads and charms. You can also upcycle old necklaces or fabric scraps.
For safety, keep small parts away from young kids and store finished bracelets in ziplock bags to avoid tangles. To clean them, use a damp cloth—avoid soaking delicate materials.
Planning a group activity? These designs work great for workshops or kids’ parties. Simplify steps for younger crafters by using larger beads and elastic cords.
You can also film a quick tutorial for online sharing—just set up a clean background and talk through each step.
Conclusion
Wasn’t that fun? Making Halloween bracelets is such a great way to get into the spooky spirit.
Whether you’re rocking a pumpkin charm bracelet or gifting a black cat one to a friend, these creations add a personal touch to the season.
I hope you feel inspired to try these out and maybe even come up with your own designs.
Got a cool variation? Share it with friends or post it online—I’d love to see what you create! For more inspiration, check out craft blogs like Craftsy or YouTube channels for jewelry tutorials.
Happy crafting, and have a spooktacular Halloween!

Emily Harper is a kitchen decor expert and interior designer with a passion for creating stylish, functional spaces. As a busy mom, she understands the importance of a kitchen that works for both family life and design. With 6 years of experience, Emily specializes in transforming kitchens into inviting, practical spaces. She’s known for her ability to blend trends with everyday needs, helping families create kitchens that feel like the heart of the home.