13 Budget-Friendly Dollar Tree Halloween Centerpiece Ideas
I’ve organized these 13 centerpieces into three categories to match your Halloween mood: Classic Spooky for traditional chills, Whimsical Witchy for fun and playful vibes, and Elegant Eerie for sophisticated scares.

Each project uses only Dollar Tree items, keeping costs between $1 and $5. These centerpieces are bold, durable for parties, and adaptable for any table size. Let’s explore!
Table of Contents
- Category 1: Classic Spooky (Ideas 1–5) – Evoke Traditional Halloween Terrors with Simple, Shadowy Designs
- Category 2: Whimsical Witchy (Ideas 6–9) – Infuse Playful Magic and Cute Critters for Family-Friendly Fun
- Category 3: Elegant Eerie (Ideas 10–13) – Sophisticated Shadows and Subtle Scares for Adult Gatherings
- Conclusion
Category 1: Classic Spooky (Ideas 1–5) – Evoke Traditional Halloween Terrors with Simple, Shadowy Designs
Nothing says Halloween like creepy pumpkins, skeletons, and ghostly glows. These five ideas bring that timeless haunted-house feel to your table with minimal effort.
1. Glow-in-the-Dark Pumpkin Patch

Want a centerpiece that glows like a haunted graveyard? This mini pumpkin patch is perfect. It’s simple, striking, and creates instant ambiance.
Materials:
- 5 mini faux pumpkins ($1 pack)
- 10 glow sticks or LED tea lights ($1 pack)
- Black craft sand ($1 bag)
Step-by-Step Instructions:
- Grab a Dollar Tree tray and spread black craft sand across it to mimic dark soil.
- Nestle the mini pumpkins into the sand, spacing them unevenly for a natural look.
- Insert a glow stick or LED tea light into each pumpkin (cut a small hole if needed).
- Add wisps of Dollar Tree cobweb material around the edges for a spooky touch.
Cost Breakdown: $3 total ($1 tray + $1 pumpkins + $1 lights).
Pro Tips: Take this outside at dusk to maximize the glow effect. Mix in pumpkins of different sizes for extra depth. If you want a reusable option, stick with LED lights instead of glow sticks. This setup satisfies your desire for a quick, glowing centerpiece that sets the mood instantly.
2. Skeleton Hand Candle Holders

Imagine skeleton hands creeping out of your table, clutching flickering candles. This centerpiece is creepy yet simple, perfect for a haunted dinner vibe.
Materials:
- Plastic skeleton hands ($1 pair)
- Battery-operated candles ($1 pack of 3)
- Faux moss ($1 bag)
- Small vase ($1)
Step-by-Step Instructions:
- Fill a small Dollar Tree vase with faux moss to create a swampy base.
- Position the skeleton hands to look like they’re gripping the candles.
- Secure the hands to the candles with a few hot glue dots (use Dollar Tree’s glue gun if you have one).
- Scatter extra plastic bones or moss around the vase for a graveyard feel.
Cost Breakdown: $4 total ($1 hands + $1 candles + $1 moss + $1 vase).
Pro Tips: Use flameless candles for safety, especially with kids around. Add a few drops of red paint to mimic blood for extra creepiness. This project is reusable for other spooky holidays like Day of the Dead, meeting your need for versatile decor.
3. Witch’s Cauldron Potion Center

Channel your inner witch with a bubbling cauldron centerpiece. Floating eyeballs and glowing lights make this a fun, interactive showstopper.
Materials:
- Black plastic cauldron ($1)
- Ping pong balls (as eyeballs, $1 pack)
- Green tissue paper ($1 pack)
- LED string lights ($1 pack)
Step-by-Step Instructions:
- Line the cauldron with crumpled green tissue paper to mimic a potion.
- Weave LED string lights through the tissue for a glowing effect.
- Draw pupils on ping pong balls with a marker and float them in the “potion.”
- Top with a faux lid (cut from black foam, $1) for a brewing look.
Cost Breakdown: $4 total ($1 cauldron + $1 balls + $1 tissue + $1 lights).
Pro Tips: Gently shake the cauldron during your party to create a “bubbling” illusion. Add a drop of Dollar Tree essential oil (like lavender) for a mystical scent. This centerpiece fulfills your desire for something guests can interact with and admire.
4. Ghostly Fabric Drape Display

Create an ethereal scene with floating ghost figures draped in sheer fabric. This centerpiece is minimalist but hauntingly beautiful.
Materials:
- White cheesecloth ($1 roll)
- Mason jars ($1 pack of 2)
- Cotton balls ($1 bag)
- Black marker ($1)
Step-by-Step Instructions:
- Draw ghost faces on cotton balls with a black marker (simple eyes and mouths work great).
- Stuff the cotton balls into the mason jars to fill them loosely.
- Drape cheesecloth over the jars, letting it flow naturally for a ghostly effect.
- Place a battery-operated tea light inside each jar to make the ghosts glow.
Cost Breakdown: $4 total ($1 cheesecloth + $1 jars + $1 cotton + $1 marker).
Pro Tips: Layer multiple jars at different heights for a dynamic look. If you’re using this outdoors, the breeze will make the cheesecloth flutter, adding to the spooky vibe. This project meets your need for a simple yet haunting centerpiece.
5. Bat Swarm Branch Bouquet

Picture twisted branches with a swarm of bats hovering above a raven’s nest. This centerpiece brings a rustic, creepy charm to your table.
Materials:
- Black foam sheets ($1 pack)
- Twigs ($1 bundle)
- Plastic raven ($1)
- Glue dots ($1 pack)
Step-by-Step Instructions:
- Cut bat shapes from black foam sheets (use a template or freehand for variety).
- Attach the bats to the twigs using glue dots, positioning them like they’re flying.
- Bundle the twigs in a Dollar Tree vase or jar for stability.
- Nestle the plastic raven at the base for a brooding touch.
Cost Breakdown: $4 total ($1 foam + $1 twigs + $1 raven + $1 glue).
Pro Tips: Hang extra bats from the ceiling with fishing line to tie the room together. Paint the twigs gray with Dollar Tree craft paint for a foggy, eerie effect. This centerpiece satisfies your desire for natural elements and a rustic Halloween aesthetic.
Category 2: Whimsical Witchy (Ideas 6–9) – Infuse Playful Magic and Cute Critters for Family-Friendly Fun
If you’re after a lighter, more playful Halloween vibe, these four ideas are perfect. They’re kid-friendly, colorful, and full of witchy charm.
6. Candy Corn Cauldron Tower

Who doesn’t love candy corn? This stacked cauldron tower overflows with orange, white, and yellow tissue, creating a sweet centerpiece.
Materials:
- 3 mini cauldrons ($1 each)
- Colored tissue paper (orange, white, yellow, $1 per pack)
- Wooden dowels ($1 pack)
Step-by-Step Instructions:
- Stuff each cauldron with layers of tissue paper in candy corn colors (yellow at the bottom, orange, then white).
- Skewer the cauldrons onto wooden dowels to stack them vertically.
- Cut a witch hat from black paper ($1) and place it on top.
- Arrange extra tissue around the base to mimic spilled candy.
Cost Breakdown: $5 total ($3 cauldrons + $1 tissue + $1 dowels).
Pro Tips: Swap tissue for real candy corn if you want an edible version (just keep it sealed for reuse). Scale this down for smaller kids’ tables. This project meets your need for a candy-themed centerpiece that’s fun for all ages.
7. Enchanted Mushroom Fairy Ring

Bring a magical woodland vibe to your table with a circle of colorful toadstool mushrooms around a glowing crystal ball. It’s whimsical and adorable.
Materials:
- Foam mushrooms ($1 pack)
- Clear jar ($1)
- Purple glitter ($1 bag)
- Green pipe cleaners ($1 pack)
Step-by-Step Instructions:
- Arrange foam mushrooms in a circle on a tray to form a fairy ring.
- Fill the clear jar with purple glitter to mimic a magical potion or crystal ball.
- Weave green pipe cleaners around the mushrooms as vines.
- Place the jar in the center of the ring for a glowing focal point.
Cost Breakdown: $4 total ($1 mushrooms + $1 jar + $1 glitter + $1 pipe cleaners).
Pro Tips: Add tiny LED lights inside the jar for extra sparkle. This centerpiece doubles as a photo backdrop for your Halloween party. It fulfills your desire for a cute, non-scary decor option.
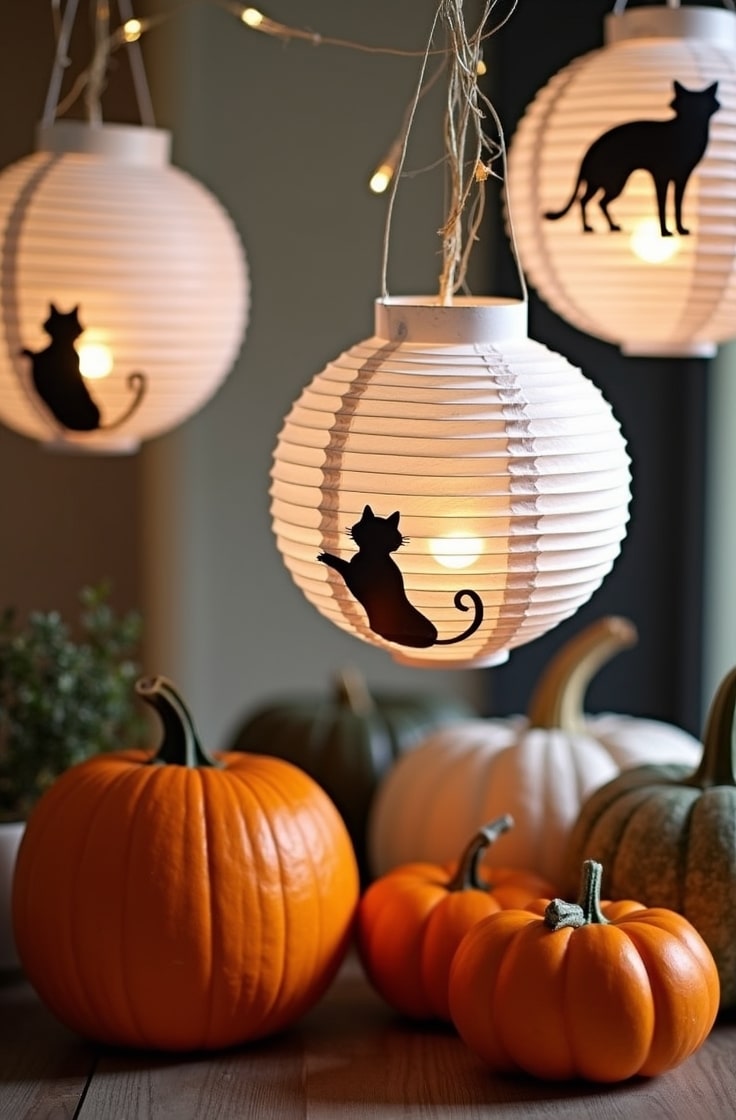
8. Black Cat Silhouette Lanterns

Black cats are Halloween icons, and these paper lanterns with cat silhouettes create a playful, prowling parade across your table.
Materials:
- White paper lanterns ($1 pack of 2)
- Black construction paper ($1 pack)
- Yarn ($1 skein)
- LED bulbs ($1 pack)
Step-by-Step Instructions:
- Cut cat silhouettes from black construction paper (think arched backs and raised tails).
- Glue the silhouettes onto the paper lanterns with glue dots.
- String the lanterns onto yarn to create a garland effect.
- Hang low over the table and place LED bulbs inside for a warm glow.
Cost Breakdown: $4 total ($1 lanterns + $1 paper + $1 yarn + $1 bulbs).
Pro Tips: Vary the cat poses for extra whimsy. Pair with Dollar Tree pumpkin fillers for a cohesive look. This centerpiece meets your need for adorable, pet-themed decor that’s perfect for family gatherings.
9. Spellbook Stack with Wand

Channel a young witch’s library with a stack of notebooks disguised as spellbooks, topped with a starry wand. It’s perfect for sparking imagination.
Materials:
- Plain notebooks ($1 each, need 2)
- Black markers ($1 pack)
- Star stickers ($1 pack)
- Dowel rod ($1)
Step-by-Step Instructions:
- Decorate notebook covers with runes, spells, or mystical symbols using black markers.
- Stack the notebooks and tie them with a ribbon from Dollar Tree.
- Attach star stickers to a dowel rod to create a magical wand.
- Insert the wand into the stack, leaning it slightly for charm.
Cost Breakdown: $5 total ($2 notebooks + $1 markers + $1 stickers + $1 dowel).
Pro Tips: Write silly spells inside the notebooks for guests to read. Add Dollar Tree feathers for extra flair. This project satisfies your desire for a creative, storytelling-inspired centerpiece.
Category 3: Elegant Eerie (Ideas 10–13) – Sophisticated Shadows and Subtle Scares for Adult Gatherings
For a more refined Halloween vibe, these four centerpieces bring gothic elegance and subtle chills to your table. Perfect for adult parties or upscale gatherings.
10. Crystal Skull Chalice Arrangement

This gothic centerpiece features a faux crystal skull chalice filled with black roses and dripping wax. It’s hauntingly beautiful and perfect for a classy Halloween.
Materials:
- Plastic skull cup ($1)
- Black silk flowers ($1 bunch)
- Red candle wax ($1)
- Glass beads ($1 bag)
Step-by-Step Instructions:
- Fill the skull cup with glass beads to create a sparkling base.
- Arrange black silk flowers in the cup, letting some spill over.
- Drip red candle wax over the edges for a bloody effect (use a Dollar Tree candle).
- Place a small plastic skull on the rim for extra drama.
Cost Breakdown: $4 total ($1 cup + $1 flowers + $1 wax + $1 beads).
Pro Tips: Pair with real tea lights for a subtle flicker (keep them safe). Match with a black tablecloth for a luxe look. This centerpiece fulfills your desire for a sophisticated, budget-friendly gothic vibe.
11. Midnight Mirror Maze

Create an illusion of infinite depth with mirrored tiles reflecting candlelight through black tulle. This centerpiece is mesmerizing and mysterious.
Materials:
- Craft mirrors ($1 pack of 4)
- Black tulle ($1 roll)
- Smoke sticks (dry ice alternative, $1 pack)
- Battery-operated candles ($1 pack)
Step-by-Step Instructions:
- Build a small frame with Dollar Tree cardboard to hold the mirrors.
- Attach mirrors at angles and drape black tulle over them loosely.
- Activate smoke sticks to create a foggy effect (follow package safety instructions).
- Place candles in front to reflect light through the maze.
Cost Breakdown: $4 total ($1 mirrors + $1 tulle + $1 smoke + $1 candles).
Pro Tips: Adjust mirror angles to create different illusions. This is safe for indoor use with battery candles. It meets your need for a visually striking, magical centerpiece.
12. Vintage Ouija Board Platter

Turn your table into a séance with a repurposed Ouija board platter, complete with planchette markers and scattered tarot cards. It’s interactive and eerie.
Materials:
- Cardboard ($1 sheet)
- Markers ($1 pack)
- Playing cards ($1 pack)
- Wooden planchette ($1 craft piece)
Step-by-Step Instructions:
- Draw a Ouija board grid on the cardboard with letters and numbers.
- Cut a planchette shape from wood or extra cardboard.
- Scatter playing cards around the board to mimic tarot cards.
- Elevate the board on Dollar Tree risers for height.
Cost Breakdown: $4 total ($1 cardboard + $1 markers + $1 cards + $1 planchette).
Pro Tips: Laminate the board with Dollar Tree clear tape for durability. Add glow-in-the-dark paint for a spooky effect. This centerpiece satisfies your desire for an interactive, game-night-ready decor piece.
13. Raven Feather Fan Display

Inspired by Edgar Allan Poe, this centerpiece features black feather fans behind a perched raven, with subtle LED accents for poetic elegance.
Materials:
- Black feathers ($1 pack)
- Plastic raven ($1)
- Paper fans ($1 pack)
- LED strip ($1)
Step-by-Step Instructions:
- Attach black feathers to paper fans with glue dots for a lush effect.
- Position the plastic raven in the center of a tray or table.
- Weave an LED strip behind the fans for a soft glow.
- Fan out the feather-covered fans behind the raven for drama.
Cost Breakdown: $4 total ($1 feathers + $1 raven + $1 fans + $1 LED).
Pro Tips: Layer the fans for extra dimension. Add a pine-scented spray from Dollar Tree for an autumnal vibe. This project meets your need for a literary, elegant Halloween centerpiece.
Conclusion
There you have it—13 Dollar Tree Halloween centerpieces that bring spooky, whimsical, and elegant vibes to your table, all for under $65 total if you make every single one! I love how these projects let you mix and match elements to suit your style.
Store them carefully in plastic bins for next year, or swap out colors for other holidays. For small tables, scale down by using fewer items; for larger ones, double up on materials. Head to Dollar Tree early to grab seasonal items, or check their website for year-round craft supplies.
Share your creations online with #DollarTreeHalloween for inspiration. Pair these with matching garlands or table runners for a full spooky setup, and feel good knowing most materials are reusable. Happy crafting, and here’s to a hauntingly fun Halloween!

Emily Harper is a kitchen decor expert and interior designer with a passion for creating stylish, functional spaces. As a busy mom, she understands the importance of a kitchen that works for both family life and design. With 6 years of experience, Emily specializes in transforming kitchens into inviting, practical spaces. She’s known for her ability to blend trends with everyday needs, helping families create kitchens that feel like the heart of the home.