15 Spooky Halloween Window Display Ideas to Wow Your Neighbors
Every October, I get this little spark of excitement when I think about Halloween. The costumes. The candy. The crisp air. But for me, one of the best parts is setting the stage right at home — and nothing does that better than a good Halloween window display.
Why? Because it’s the first thing people see when they walk by. It’s your way of saying, “Yes, this house is ready for Halloween!” Whether you go scary, silly, or totally magical, your window can tell a whole story before anyone even rings the doorbell.
In this guide, I’m sharing 15 Halloween window display ideas I’ve used and loved over the years — plus some I’ve seen that made me stop in my tracks.
You’ll find budget-friendly options, high-drama showstoppers, and plenty in between. My promise? You’ll leave with at least one idea you can’t wait to try.
Table of Contents
- Inspiration & Theme Selection
- The 15 Halloween Window Display Ideas
- 1. Spooky Silhouette Scenes
- 2. Pumpkin Parade Window Ledge
- 3. Witch’s Potion Lab
- 4. Gothic Candle Glow
- 5. Animated Halloween Scene
- 6. Haunted Drapery Illusion
- 7. Spider Web Invasion
- 8. Vintage Halloween Charm
- 9. Creepy Doll Display
- 10. Skeleton in the Window
- 11. Glowing Ghost Parade
- 12. Bloody Handprint Horror
- 13. Jack-o’-Lantern Stack
- 14. Bats in Flight
- 15. Themed Window Boxes
- Step-by-Step Implementation Guide
- Budget Breakdown and Time Estimates
- Conclusion
Inspiration & Theme Selection
Before we dive into the ideas, let’s talk about choosing a theme.
When I plan my Halloween display, I always start by asking: What mood am I going for?
- Do I want spooky and dark with skeletons and shadows?
- Or playful and cute with smiling pumpkins?
- Maybe vintage and nostalgic, like old Halloween postcards?
Think about your audience. If your neighborhood is filled with young kids, you might lean more toward friendly ghosts instead of nightmare-level scares.
Also, look at your home’s style and exterior colors. A sleek modern home might look great with minimalist silhouettes, while a cozy cottage could shine with rustic pumpkins and warm lights.
Once you’ve picked your theme, everything else falls into place — from colors to props to lighting.
The 15 Halloween Window Display Ideas
Here we go — fifteen ways to turn your window into a Halloween masterpiece.
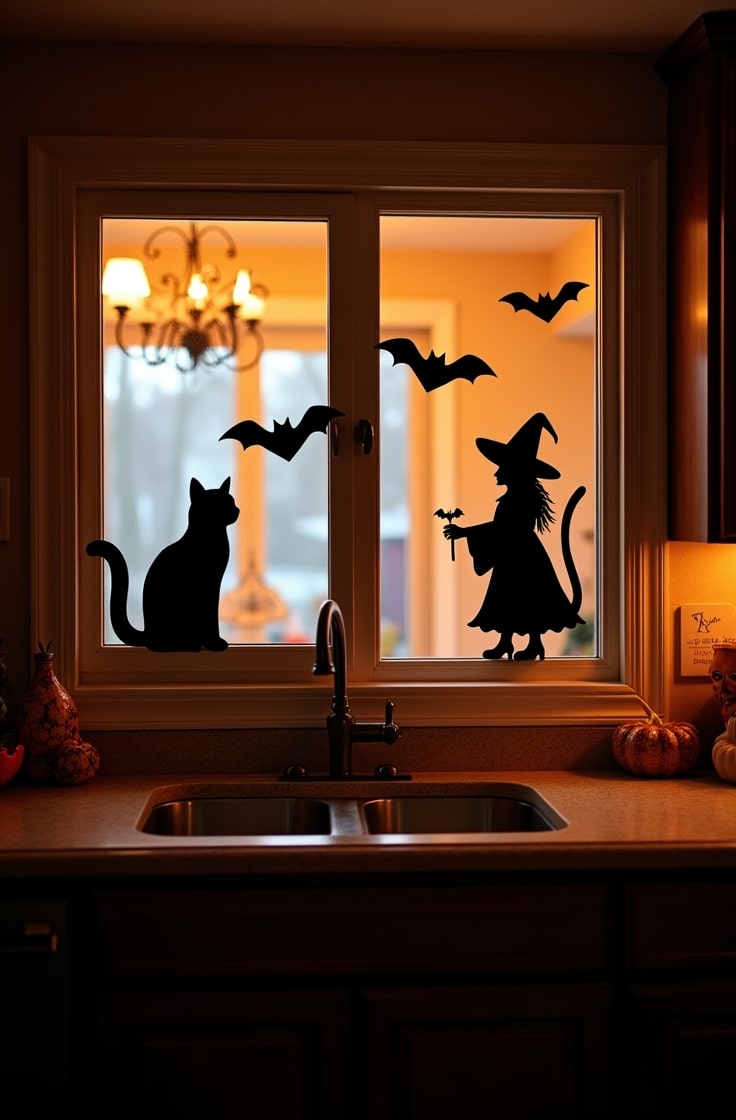
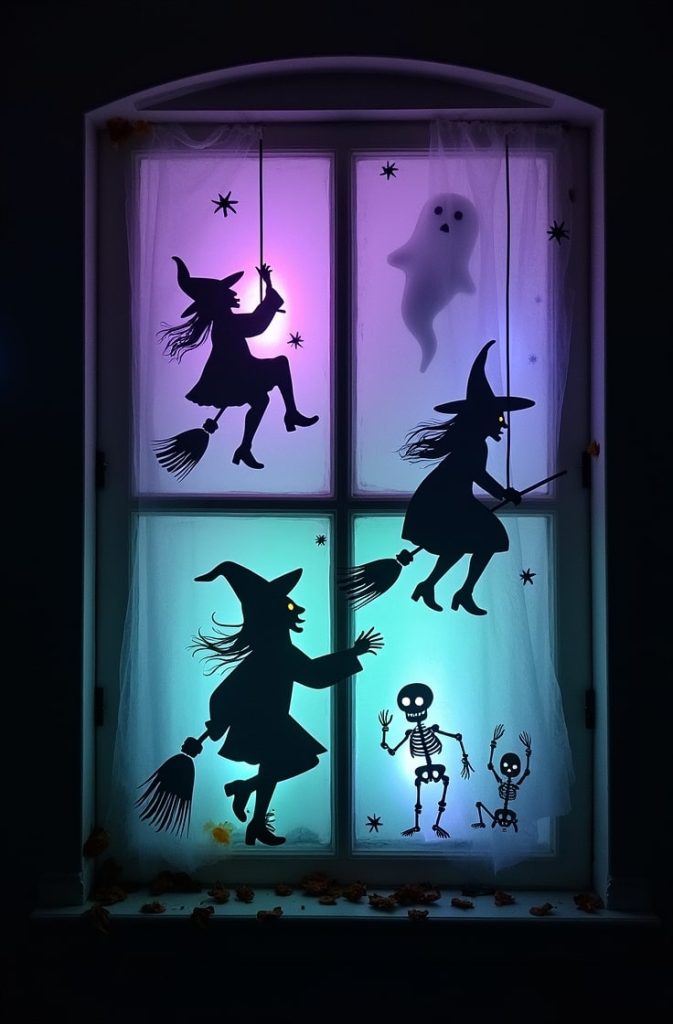
1. Spooky Silhouette Scenes
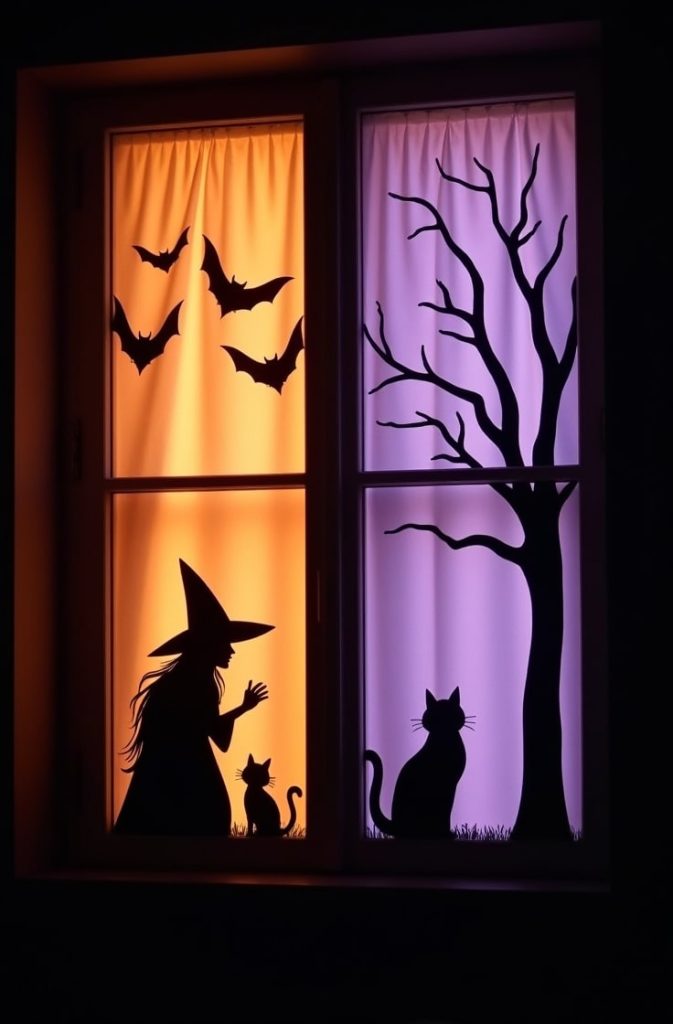
One of the easiest and most effective window displays I’ve ever done is the silhouette look.
I cut out shapes from black poster board — witches, cats, bats, even creepy trees — and taped them to the inside of my window. Then I set up a lamp or string lights behind them so they glowed against a plain curtain.
Why it works: The contrast of dark shapes against a warm or eerie light is dramatic from the street.
Styling tip: Keep the background simple so the shapes pop.
Budget-friendly option: You can download free printable silhouettes online and trace them onto cardboard or poster board.
2. Pumpkin Parade Window Ledge
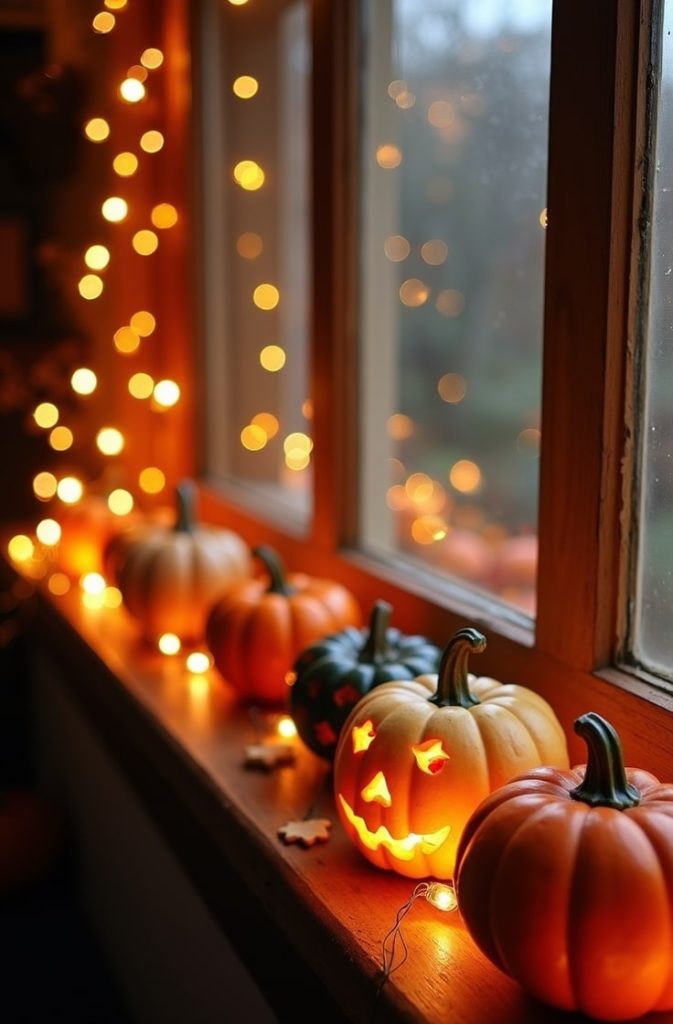
I love lining up pumpkins along my window ledge. Some carved, some painted, some just plain pretty.
Mix real pumpkins with faux ones to keep the display looking fresh all month. If your ledge isn’t wide enough, you can build a narrow shelf inside the window.
Why it works: Pumpkins are the ultimate Halloween icon, and lining them up creates a bold, cheerful display.
Styling tip: Vary the sizes and add mini string lights for sparkle.
Budget-friendly option: Dollar store foam pumpkins look surprisingly good with a coat of spray paint.
3. Witch’s Potion Lab
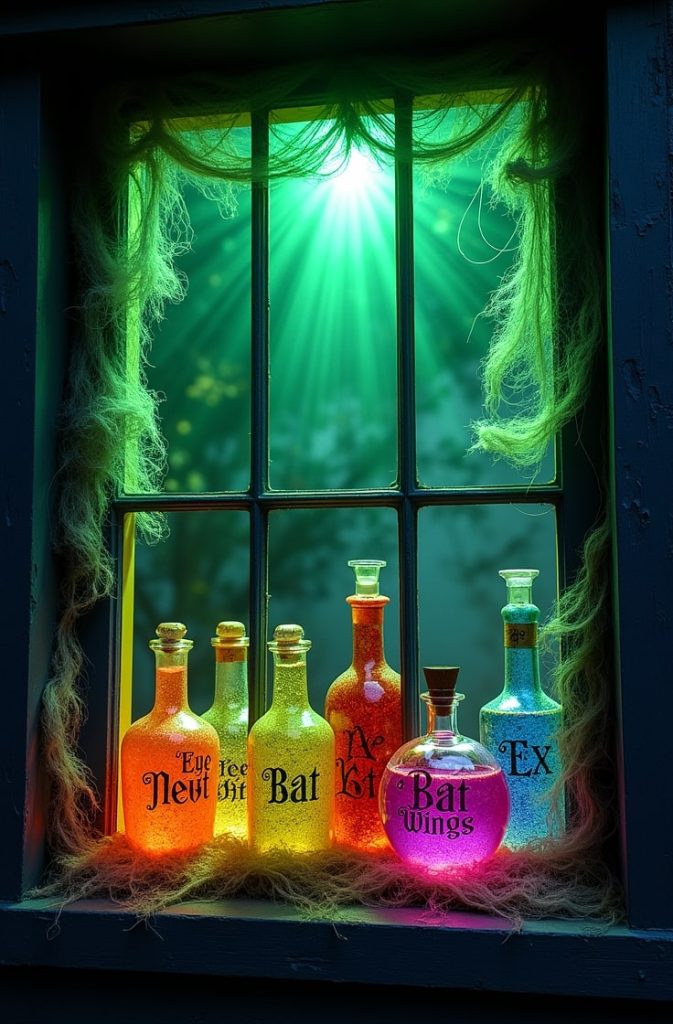
I once turned my front window into a bubbling potion lab — and it was a hit.
I filled glass bottles with colored water, labeled them “Eye of Newt” and “Bat Wings,” and added fake cobwebs. A green LED spotlight gave the whole scene an otherworldly glow.
Why it works: It’s a whole story in one glance — and kids love peeking in to see the “ingredients.”
Styling tip: Add a witch hat or broom propped in the corner to complete the look.
Budget-friendly option: Use recycled jars and bottles, and color the water with food coloring.
4. Gothic Candle Glow
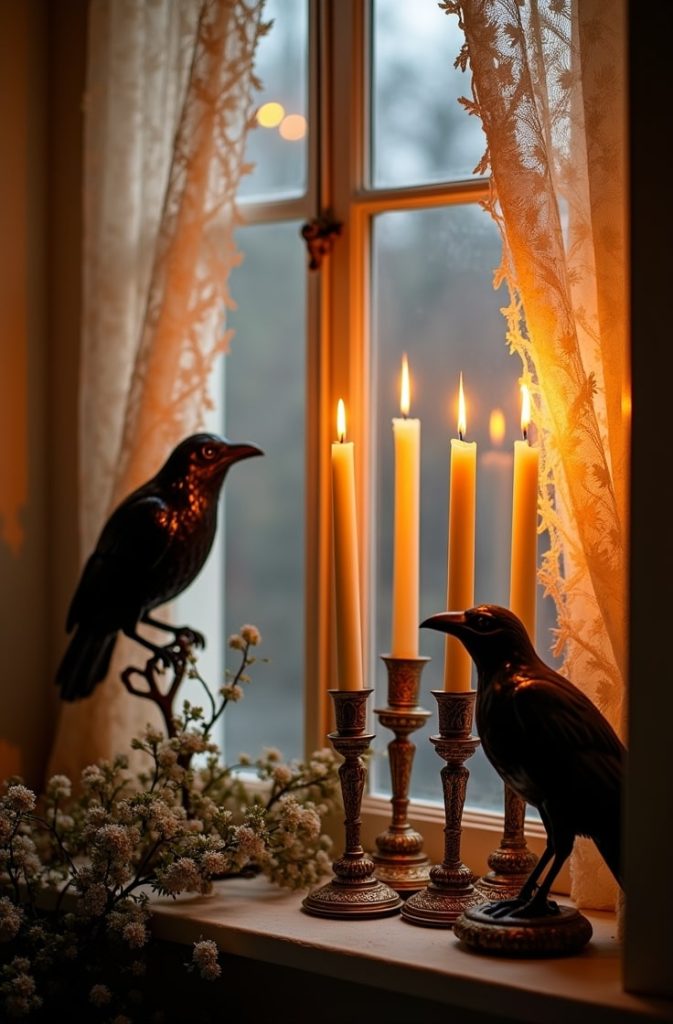
This is my go-to for a more elegant Halloween vibe.
I set up flameless candles in tall holders, scatter some faux ravens, and hang lace curtains. The flickering light through the lace is just… chef’s kiss.
Why it works: It’s dramatic yet classy — perfect for a Gothic or Victorian theme.
Styling tip: Keep your color palette to black, gold, and deep red for that moody feel.
Budget-friendly option: Thrift stores often have candleholders that look antique once spray-painted black.
5. Animated Halloween Scene
If you love a little tech, this one’s for you. I’m talking about bringing your window to life — literally.
I’ve seen (and tried) everything from gently swinging witches to dancing skeletons that seem to groove along with Halloween music. One of my favorites was a projection of a ghost that floated from one side of the window to the other, pausing every now and then to “peek” outside. Kids would gather on the sidewalk just to watch it loop.
For a high-drama look, some folks go all out with full projection-mapped haunted houses. This technique makes it look like the entire front of your home is alive — with bats flying, lightning cracking, and creepy creatures moving in and out of the windows. But you don’t have to go that far to get great results. Even a single animated prop — like a motorized bat flapping its wings or a zombie peering in and out — can create a big impact.
If you’re using projection, place it behind a sheer curtain or thin white sheet. This creates a hazy, ghostly effect that hides the source of the animation and makes it look like the figures are actually inside your home.
Why it works: Movement catches the eye faster than anything else. Even subtle motion will draw attention from the street, and kids can’t resist stopping to watch a “live” Halloween scene.
Styling tip: Keep the background dark so the moving elements really stand out. If you have other props in the same window, arrange them so they frame — not compete with — the animation.
Budget-friendly option: You don’t have to spend hundreds on a projector. Look for free or low-cost Halloween projection videos online, or borrow a small projector from a friend. For under $30, you can often find compact LED projectors perfect for this kind of display.
6. Haunted Drapery Illusion
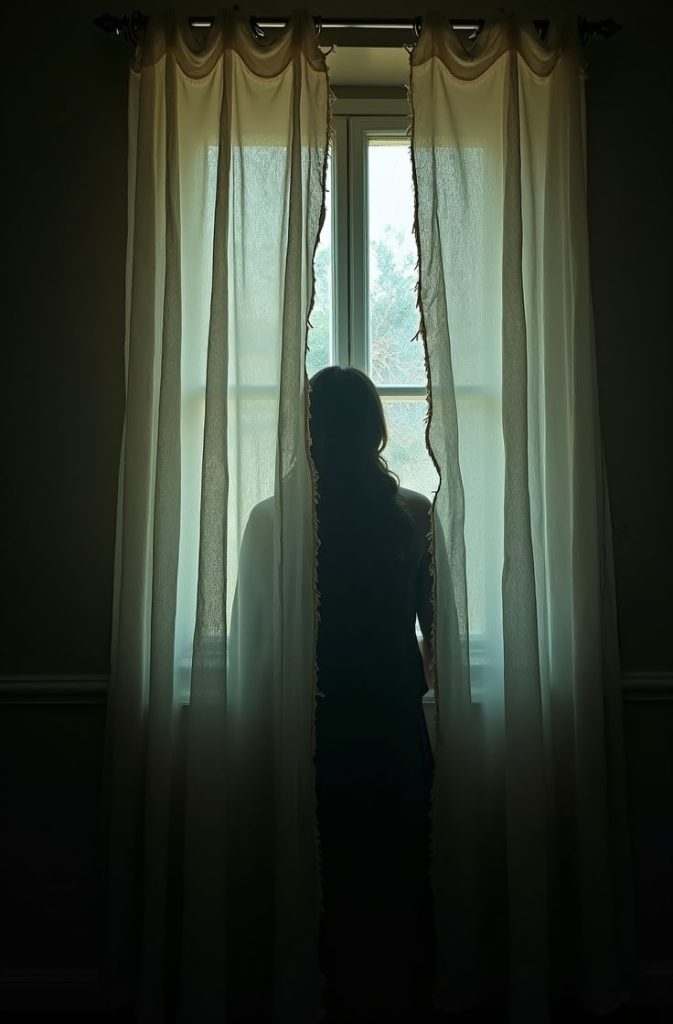
Cheesecloth or gauze makes fantastic haunted “curtains.” It’s lightweight, easy to work with, and instantly gives that old, abandoned-house vibe. I like to hang the fabric loosely so it drapes in uneven folds, with some sections sagging lower than others. Then I snip and tear random spots so it looks weathered and forgotten.
For the real scare factor, I place a shadowy figure just behind the fabric — sometimes a mannequin draped in black, other times a cardboard cutout of a person-shaped silhouette. With a dim backlight, it creates the illusion that someone (or something) is standing there, waiting. At night, the effect is downright chilling.
You can go subtle with just a hint of movement — maybe a small fan gently lifting the fabric now and then — or make it more dramatic by adding flickering light so the “figure” seems to appear and disappear.
Why it works: It’s the mystery. People can’t see exactly what’s behind the curtain, but their imagination will do the rest. From the street, it looks like something is hiding inside, and that uncertainty is what makes it so creepy.
Styling tip: Layer two or three different fabrics for a more textured, realistic look. A mix of cheesecloth, lace, and thin muslin can give depth while still letting light through.
Budget-friendly option: Use old white sheets and distress them with scissors. For a yellowed, aged look, soak them in a strong tea bath, let them dry unevenly, and fray the edges with your fingers.
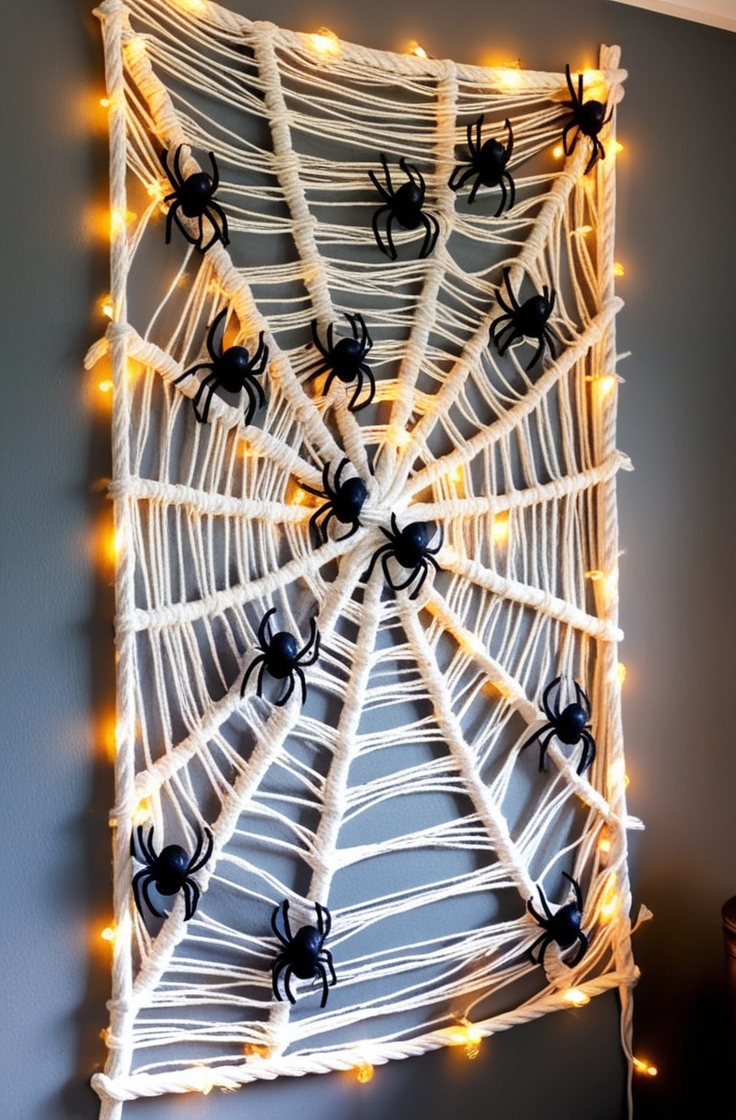
7. Spider Web Invasion
One year, I decided to go all-in on a spider theme, and it turned out to be one of my creepiest — and easiest — window displays. I covered the entire window frame with stretchy spider web material, pulling it thin in some places and leaving it thicker in others so it looked more natural.
Then I positioned giant spiders crawling across it, including one massive “queen spider” right in the center as the star of the show.
The key is to make it feel like the spiders have truly taken over your house. I like to tuck a few smaller spiders into the corners of the window, so passersby spot them a second later — that delayed “oh, there’s another one!” reaction is priceless.
For extra realism, I sometimes add a few “wrapped-up victims” made from white cloth or small doll figures bound in more webbing.
If you have a light source behind the web, go for a soft orange or eerie purple glow. This makes the web stand out at night and gives the spiders a shadowy presence that looks extra spooky from the sidewalk.
Why it works: Spiders are a universal fear, and when you make them big and plentiful, it plays right into that creepy-crawly discomfort. The giant webbing also fills a window nicely, making it look instantly decorated with minimal effort.
Styling tip: Use spiders in multiple sizes for a more realistic look — nature rarely makes them all the same. Position some partially hidden in the web to suggest movement.
Budget-friendly option: Oversized plastic spiders from discount or dollar stores work perfectly. If you can’t find large ones, you can make them with black balloons for bodies and pipe cleaners for legs.
8. Vintage Halloween Charm
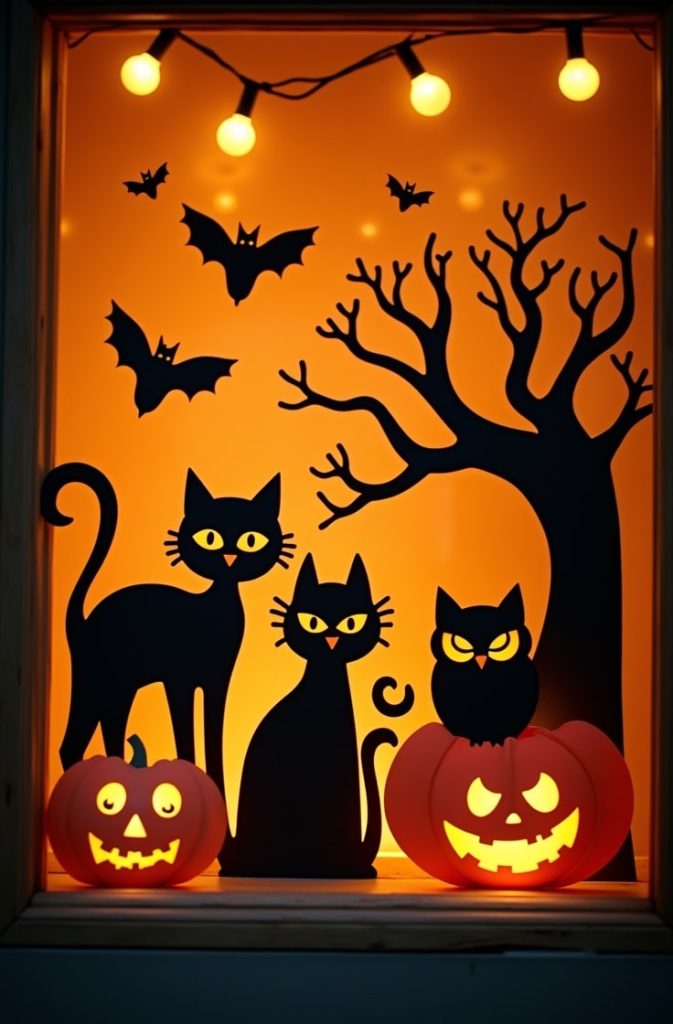
Sometimes, the spookiest thing isn’t a jump scare — it’s nostalgia. I love creating a window scene that feels like it came straight out of a 1930s Halloween postcard. Think old-fashioned paper cutouts, smiling black cats, wide-eyed owls, and cheerful but slightly eerie jack-o’-lanterns.
I usually start by collecting reproduction vintage decorations — the kind with bold colors and that slightly faded look. I arrange them against a backdrop of warm orange fabric or kraft paper to give everything a cozy, old-time glow. If you want to go a step further, add a few vintage-style string lights or flickering faux candles in the background. It makes the scene feel warm and inviting, but still mysterious.
One of my favorite touches is an old rocking chair in the window with a carved pumpkin sitting on it, wearing a witch hat. A small lantern next to it completes the “front porch in 1940” vibe.
Why it works: Vintage imagery feels timeless and charming, but there’s always that hint of the uncanny when you mix it with Halloween themes. It’s perfect if you want a display that appeals to both kids and adults without going overboard on the scare factor.
Styling tip: Stick to a muted color palette — orange, black, cream, and maybe a pop of green. Too many bright colors can break the vintage illusion.
Budget-friendly option: Print free vintage Halloween illustrations from public domain collections online and mount them on cardboard. Pair them with thrift store finds like old lamps, picture frames, or tablecloths to create that authentic aged feel.
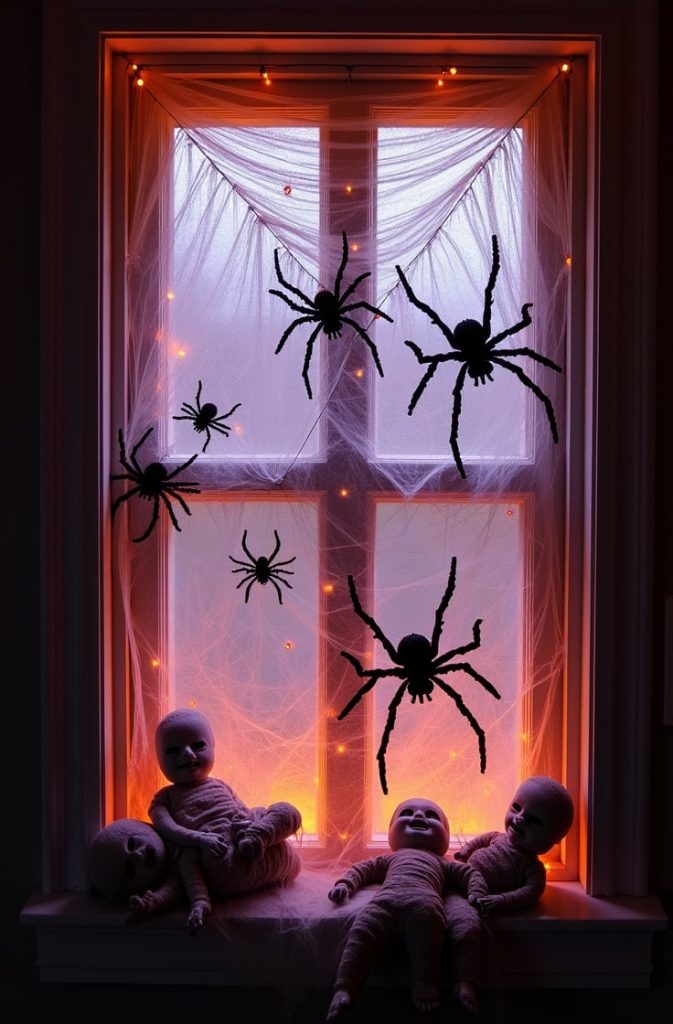
9. Creepy Doll Display
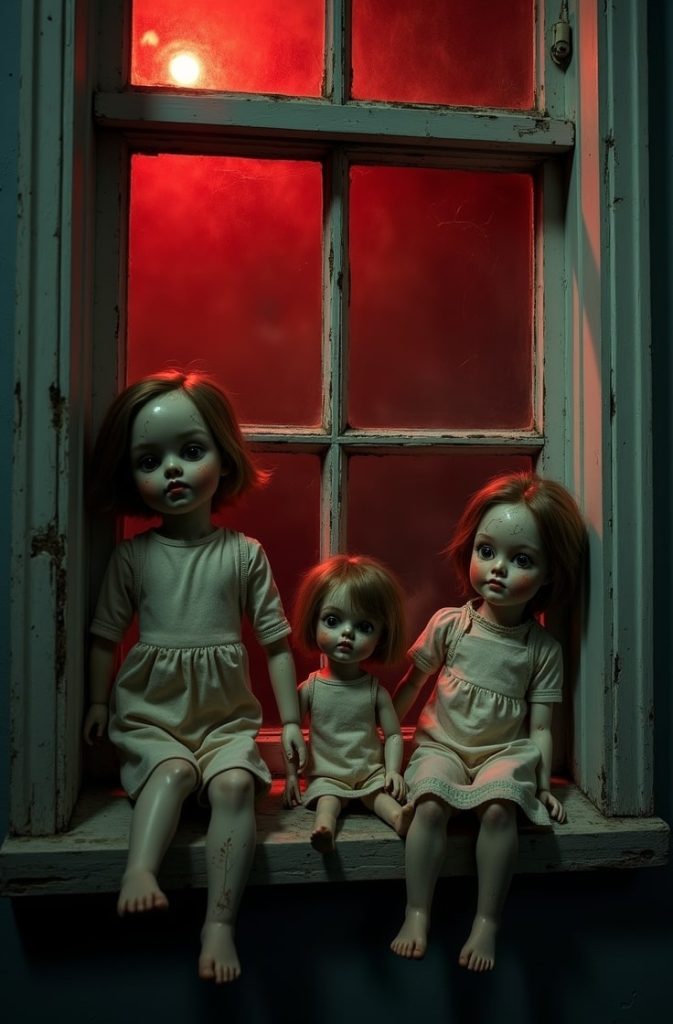
Okay, this one’s not for the faint of heart. There’s something about dolls — the blank stares, the frozen smiles — that already feels a little unsettling.
I’ve found old dolls at thrift stores, garage sales, and flea markets, then “aged” them with a bit of dirt, smudged makeup, or a missing eye for extra creep factor.
I pose them in odd, unnatural positions, sometimes looking straight out the window, sometimes turned slightly away like they’re plotting something.
Add a dim red or flickering light, and… yeah, it gets under people’s skin fast.
Why it works: Dolls tap into a primal kind of discomfort. Multiply that by Halloween, and you’ve got a shiver-worthy display.
Styling tip: Place them at different heights so it feels like they’re slowly moving closer.
Budget-friendly option: Thrift stores and flea markets are doll goldmines.
10. Skeleton in the Window
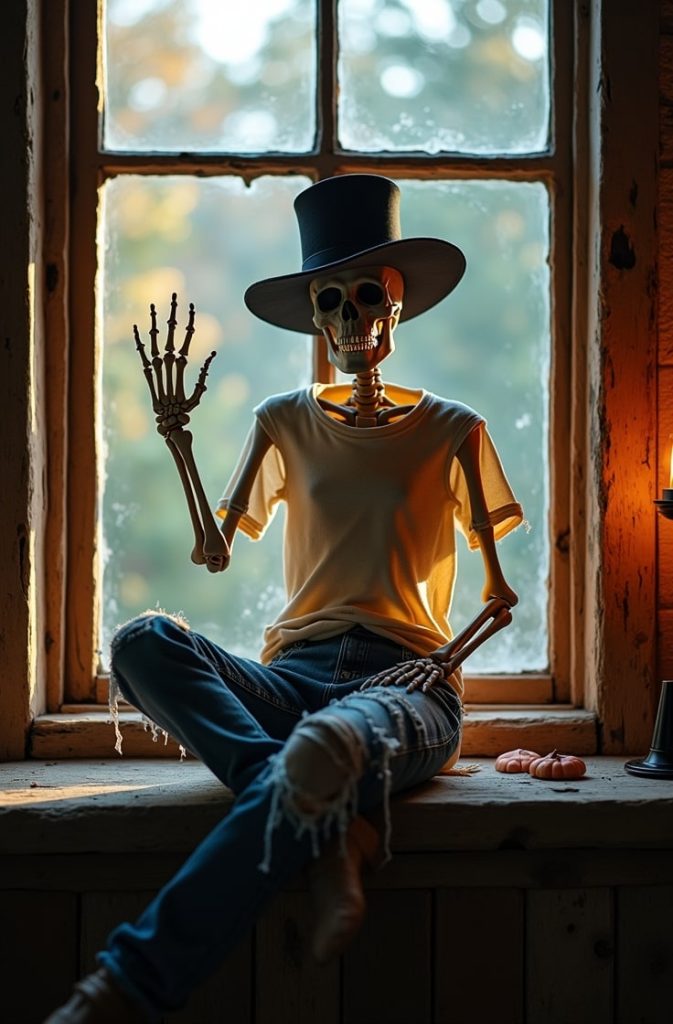
This one’s simple, but it always gets a reaction. I set a full-size posable skeleton right in the window, angled so it looks like it’s making direct eye contact with people walking by.
One arm is usually propped up in a wave, as if it’s been patiently greeting everyone all day. It’s interactive without actually moving, and there’s something oddly charming about it.
You can keep it classic with bare bones, or dress it up for humor — think a Hawaiian shirt and sunglasses — or give it a creepy twist with tattered, dirt-stained clothes and a wide-brimmed hat. I’ve even added a prop coffee mug for a “just hanging out” vibe.
Why it works: People can’t help but smile, whether it’s spooky or silly.
Styling tip: Change the skeleton’s pose every few days to keep things fresh.
Budget-friendly option: Inflatable skeletons are a great alternative if you don’t have storage space for a full-size plastic one.
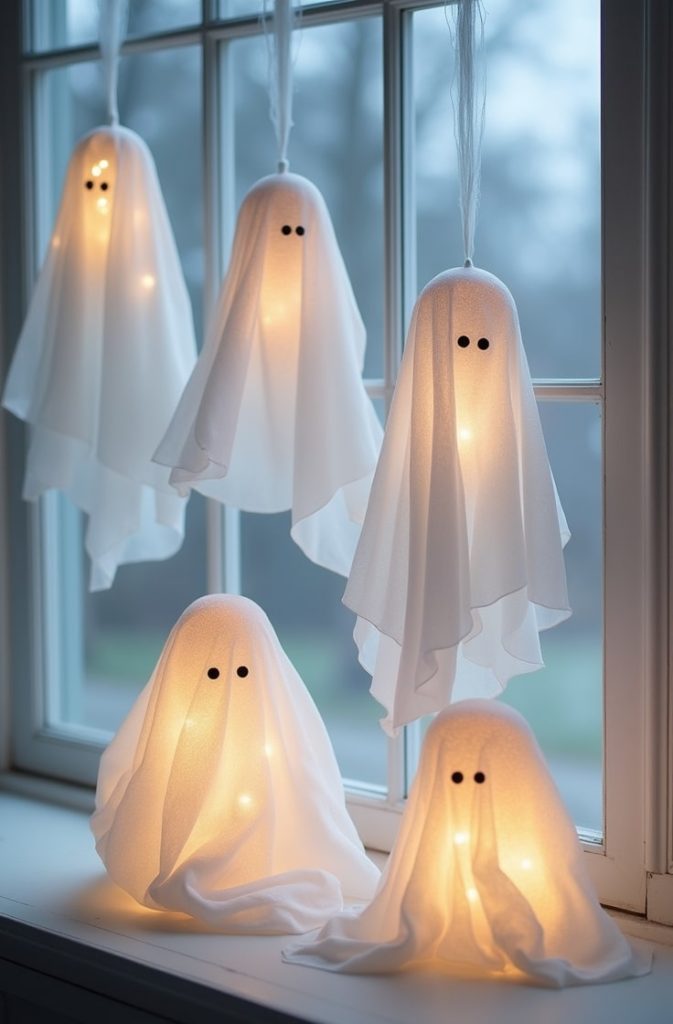
11. Glowing Ghost Parade

This one’s pure Halloween magic. I love hanging ghost shapes made from white fabric draped over foam balls or lightweight plastic spheres, each with a small LED light tucked inside. When the lights glow softly at night, the ghosts look like they’re drifting in a slow parade right across the window.
I usually suspend them at different depths — some close to the glass, others hanging farther back — so they seem to float in layers. A gentle breeze from a fan can give them a subtle swaying motion that really sells the illusion.
Why it works: The warm, glowing effect is eye-catching without being too scary, making it great for families and younger trick-or-treaters.
Styling tip: Vary their heights and sizes for a whimsical, “marching” effect.
Budget-friendly option: Use empty soda bottles or crumpled paper for the ghost “heads,” then drape scrap white fabric or old pillowcases over them.
12. Bloody Handprint Horror
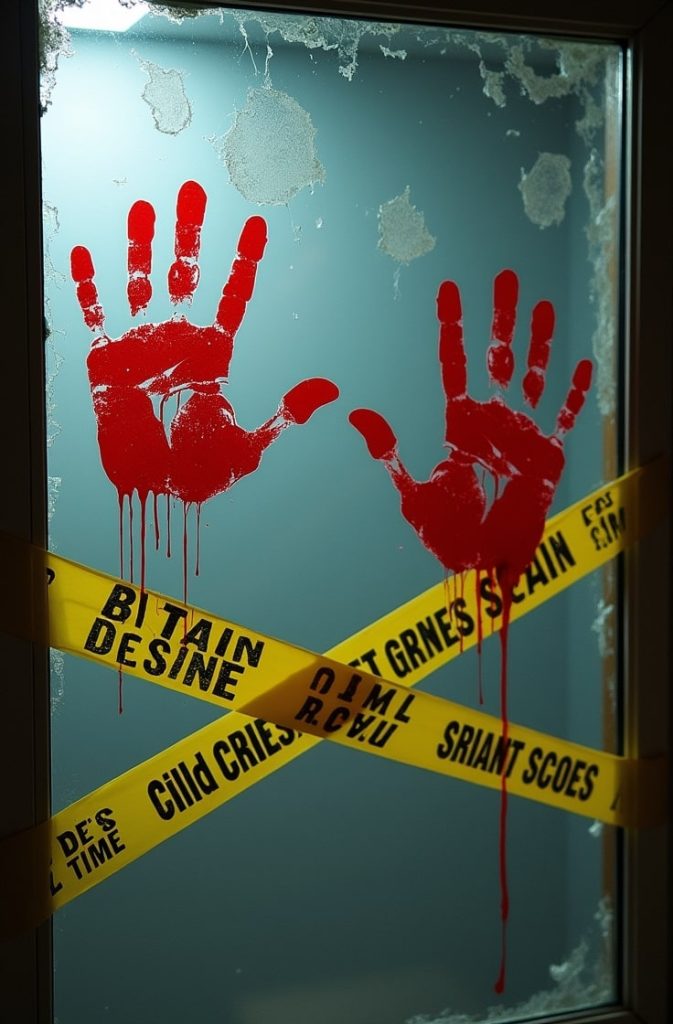
If you want your window to scream horror movie vibes, this one’s a classic that never fails. Gel clings shaped like bloody handprints slapped across the glass give an instant “something terrible happened here” look. I like to add crime-scene tape stretched diagonally over the window for extra drama — it makes the scene feel like a chilling mystery waiting to be solved.
For an even creepier effect, place just a few handprints strategically—maybe one near the top corner and another smeared down the glass—because too many can lose the impact. The irregular spacing keeps people staring and guessing.
Why it works: It’s instantly unsettling and makes people do a double-take, which is exactly what Halloween window decor should do.
Styling tip: Less is more here. A sparse arrangement of handprints feels far scarier than a wall covered in them.
Budget-friendly option: If you can’t find gel clings, you can easily paint handprints yourself on cling film or clear contact paper using red acrylic paint. It’s messy but totally worth the effect!
13. Jack-o’-Lantern Stack
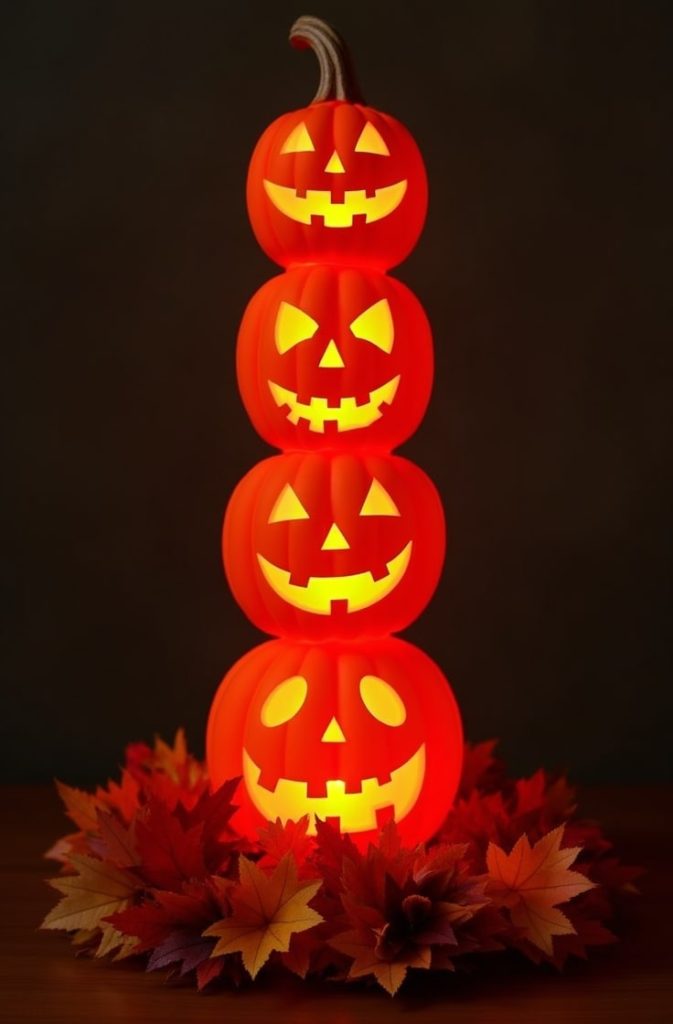
If you’re working with a narrow window or a small ledge, stacking jack-o’-lanterns is a brilliant way to create a tall, bold display that still grabs attention.
I like to carefully arrange three or four pumpkins, each carved with a different face—some smiling, some spooky, and maybe even a silly one—to add personality to the stack.
Placing LED lights inside each pumpkin gives the whole tower a warm, flickering glow that’s impossible to miss after dark.
Why it works: The vertical design makes perfect use of limited space. It draws the eye upward and creates a statement piece that’s both simple and striking.
Styling tip: Mix up the expressions—happy, scary, goofy—to keep the stack playful and fun rather than one-note. Adding a little greenery or faux autumn leaves at the base can make it feel like a mini Halloween totem.
Budget-friendly option: If carving real pumpkins feels like too much hassle or you want a display that lasts, try foam pumpkins. You can carve them just like real ones and reuse them year after year, saving time and money.
14. Bats in Flight
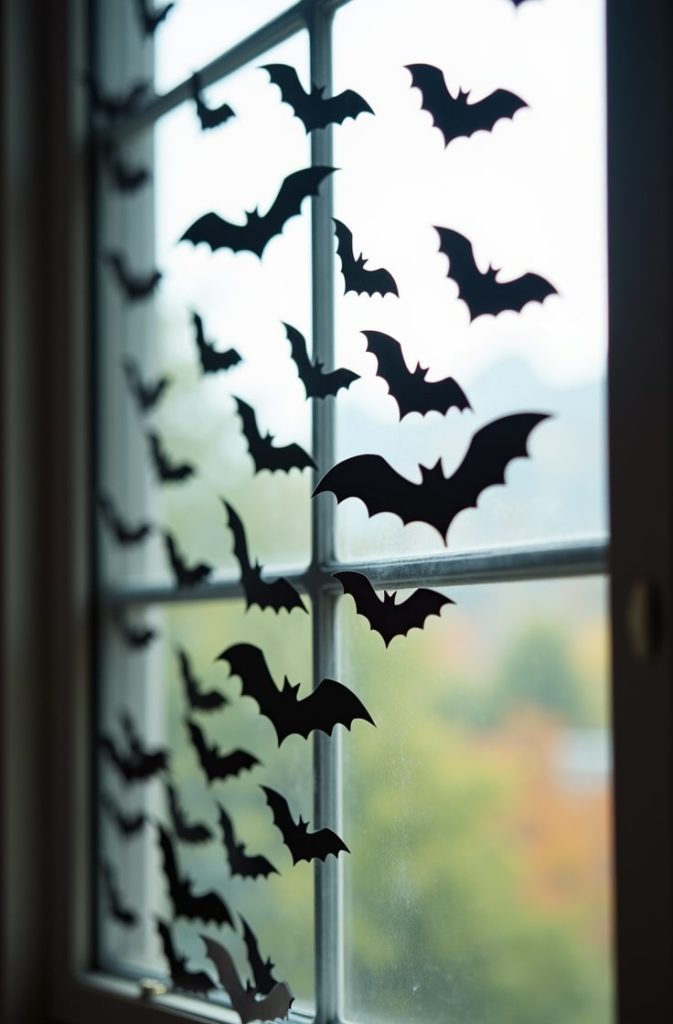
I cut out dozens of bat shapes from black cardstock or stiff paper. Then, I arrange them on the window glass. It looks like a swarm of bats is taking off into the night.
I like to cluster some bats closer together near one corner, then gradually space them out as they “fly” across the window, giving a sense of movement and direction without any actual motion.
Why it works: This display adds energy and drama simply by using shapes and positioning. It tricks the eye into seeing movement and creates a spooky, dynamic scene with minimal effort.
Styling tip: To create depth and perspective, make the bats smaller as they “fly away” from the main cluster. You can even attach some to the window frame or nearby walls for a 3D effect that draws people’s eyes around your display.
Budget-friendly option: Printable bat templates are widely available for free online. Print them on black cardstock, cut them out, and you’re ready to go — an easy, cost-effective way to craft a dramatic Halloween scene.
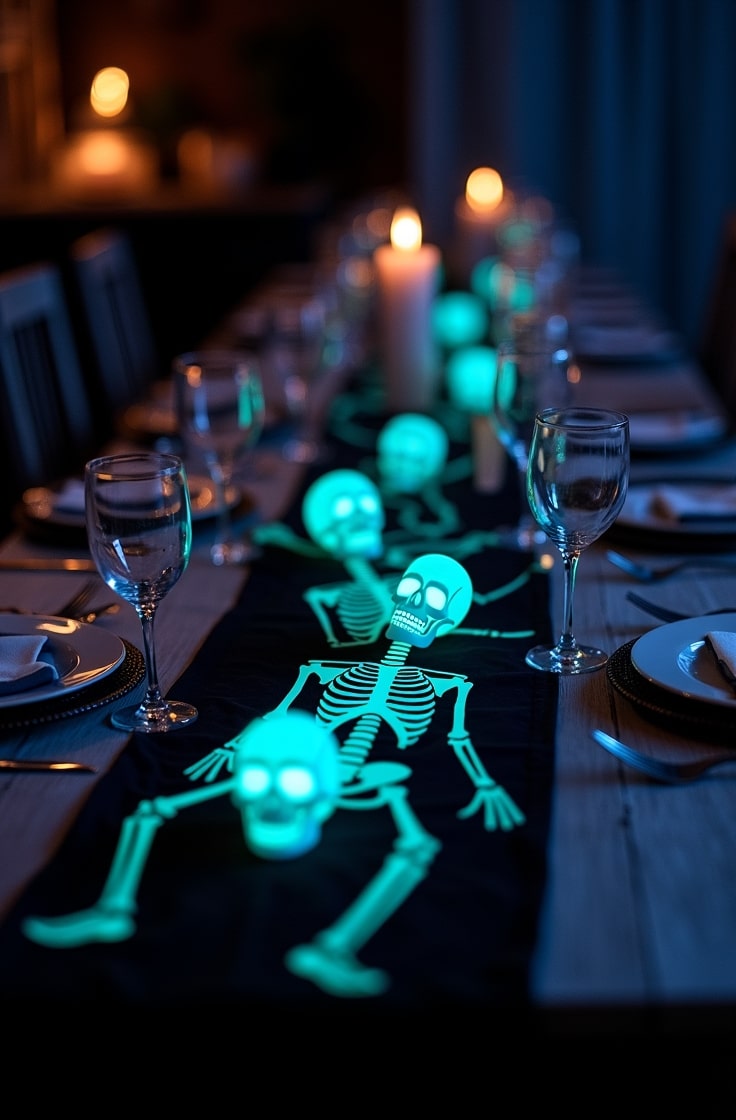
15. Themed Window Boxes
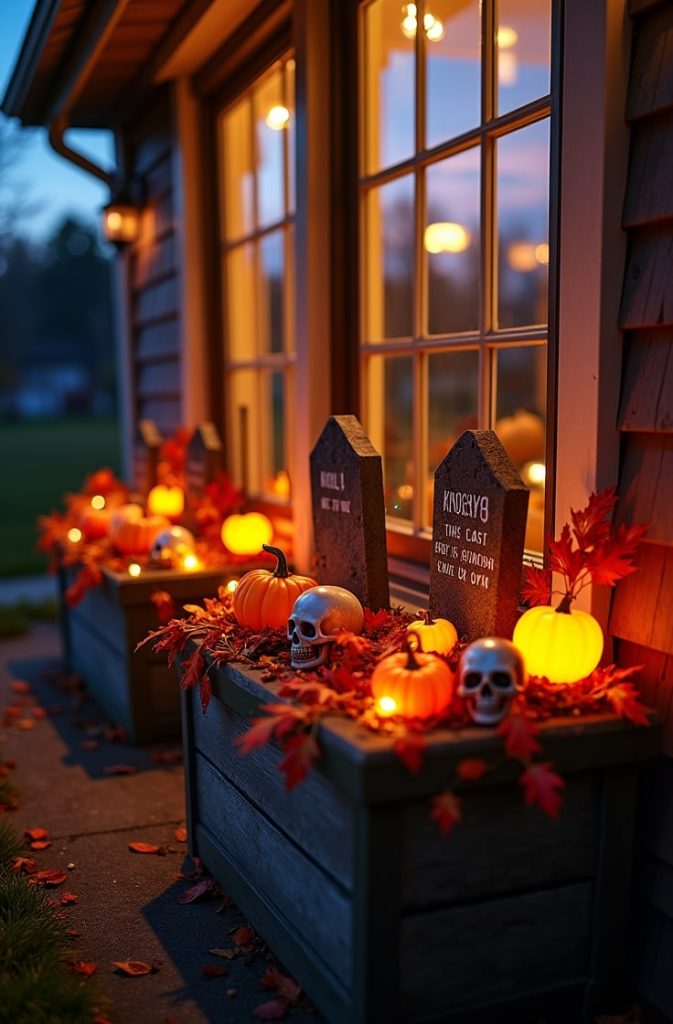
If you’re lucky enough to have planter boxes right under your windows, why not turn them into mini Halloween scenes? I’ve had so much fun filling mine with a mix of tiny pumpkins, faux skulls, and colorful autumn leaves. I’ve even added little tombstones that look like they popped right out of a spooky cemetery.
Adding a few strands of battery-powered fairy lights winds everything together with a soft glow after sunset.
Why it works: This idea extends your Halloween display beyond just the glass, tying your window decor to your home’s landscaping. It creates a more immersive experience for anyone walking or driving by, making your whole front façade feel festive and inviting.
Styling tip: To keep everything looking polished, match the colors and style of your window display inside with what’s in your window boxes. Consistency is key to making the whole setup feel intentional and harmonious.
Budget-friendly option: Don’t overlook nature’s freebies! Pinecones, twigs, dried leaves, and acorns collected from your yard or neighborhood add texture and volume at no cost, making your display lush without breaking the bank.
Step-by-Step Implementation Guide
Now that you’re buzzing with ideas, let’s talk about how to bring them to life. Here’s a simple guide to make your display a reality.
Planning Your Display
Start by picking a theme that fits your space and audience. Got a big storefront? Go bold with a witch’s lair. Small apartment window? Try the monster eyes. Sketch a quick layout to balance your elements—think about symmetry and focal points. This step saves time and ensures your display looks cohesive.
Sourcing Materials
You don’t need to spend a fortune. Check craft stores like Michael’s or Hobby Lobby for supplies like cardstock, tissue paper, or LED lights. Online marketplaces like Amazon have fog machines and props. Thrift shops are goldmines for frames, fabrics, or creepy dolls. Repurpose household items—old sheets can become ghosts, and cardboard boxes can be cut into silhouettes.
Installation Tips
Securing your decorations is key. Use suction cups or removable double-sided tape to stick items to your window—test them first to avoid damage. For heavier props, like tombstones, use sturdy bases or brackets. Lighting is crucial: place LEDs or fairy lights strategically for day and night appeal. Test your setup from outside to ensure it looks as good as you imagined.
Maintenance and Safety
If your display is outdoors, use weatherproof materials like plastic or treated foam. Check for rain or wind damage regularly. For electrical items, use outdoor-rated extension cords and keep connections dry. After Halloween, store reusable props in labeled bins to keep them safe for next year.
Budget Breakdown and Time Estimates
Let’s talk numbers. Here’s how much time and money each idea might take, so you can plan accordingly.
Low-Budget Ideas ($10–$50)
Ideas like the haunted silhouettes, jack-o’-lantern stained glass, and monster eyes are super affordable. You’ll spend $10–$50 on basic supplies like cardstock, tissue paper, or paint. These take 1–3 hours to set up, perfect for busy folks or last-minute decorators.
Mid-Range Ideas ($50–$150)
The pumpkin patch, spider webs, and graveyard scenes fall here. Expect to spend $50–$150 on props like foam tombstones, fairy lights, or plastic spiders. These take 3–6 hours, including carving or crafting time, but the results are worth it.
High-End Ideas ($150+)
For a showstopper like the witch’s lair, haunted mansion, or interactive window, budget $150 or more. Fog machines, animatronics, or premium props add up. These take 6–10 hours to perfect, but they’re ideal for businesses or die-hard Halloween fans.
Conclusion
Halloween is one of the few times of the year we get to let our imagination run wild. Your window is a stage, and you’re the set designer.
Start with one idea this year, and add to it over time. Before you know it, you’ll have your own signature look that the whole street waits for every October.
Now grab your scissors, your lights, and maybe a skeleton or two — and let’s make this Halloween unforgettable.

Emily Harper is a kitchen decor expert and interior designer with a passion for creating stylish, functional spaces. As a busy mom, she understands the importance of a kitchen that works for both family life and design. With 6 years of experience, Emily specializes in transforming kitchens into inviting, practical spaces. She’s known for her ability to blend trends with everyday needs, helping families create kitchens that feel like the heart of the home.