13 DIY Halloween Graveyard Ideas to Try
Want to turn your front yard into a spooky graveyard this October?
I’ve got you covered with 13 DIY Halloween graveyard ideas that are fun, affordable, and sure to impress your neighbors.

I’m sharing these ideas from my own experiments, and trust me, they’re easier than they look.
Each idea costs under $50, uses simple materials, and can be customized to fit your style—whether you’re going for creepy, funny, or family-friendly.
Let’s dive in and get your yard ready for some serious Halloween vibes.
Table of Contents
- Tools and Materials You’ll Need
- 13 DIY Halloween Graveyard Ideas
- 1. Foam Tombstones
- 2. Cardboard Coffins
- 3. Groundbreaker Zombie Hands
- 4. Ghostly Sheet Figures
- 5. Skeleton Poses
- 6. Eerie Fog Machine Setup
- 7. Spider Web Draping
- 8. Carved Pumpkin Graves
- 9. Graveyard Fencing
- 10. Mummy-Wrapped Statues
- 11. Sound Effect Stations
- 12. Witch’s Cauldron Brew
- 13. Illuminated Grave Markers
- Budget Breakdown
- Setup and Teardown Guide
- Safety and Legal Notes
- Final Thoughts
Tools and Materials You’ll Need
Most of these projects use basic tools and materials you probably already have. Keep these on hand: a hot glue gun, acrylic paints, scissors, a utility knife, sandpaper, a drill, and a hammer.
For materials, stock up on cardboard, Styrofoam, wooden stakes, fabric scraps, and LED lights. I’ve found dollar stores and thrift shops are goldmines for cheap props like plastic skeletons or fake flowers.
If you’re missing something, check your garage or ask a neighbor before buying new.
13 DIY Halloween Graveyard Ideas
Each idea comes with a description, materials, step-by-step instructions, customization tips, and solutions to common challenges. I’ve tested these myself, so I know they work. Let’s make your graveyard the talk of the neighborhood!
1. Foam Tombstones

What They Are
Nothing says “graveyard” like weathered tombstones. These are made from insulation foam, giving you a realistic look without breaking the bank. They’re lightweight, easy to carve, and perfect for a classic spooky vibe.
Materials
- Styrofoam sheets (1-inch thick, about $5 at hardware stores)
- Gray acrylic paint ($2)
- Black permanent markers ($1)
- Sandpaper (medium grit, $1)
- Wooden stakes ($2 for a pack)
How to Make Them
- Cut the foam into tombstone shapes using a utility knife. Think rectangles, crosses, or arched tops.
- Sand the edges lightly to create a worn, weathered look.
- Paint the foam with gray acrylic paint. Let it dry for an hour.
- Use a black marker to write inscriptions like “RIP” or funny epitaphs like “Here Lies Bob, Loved His Job.”
- Attach wooden stakes to the back with hot glue. Push the stakes into the ground to secure.
Tips for Customization
- Use stencils for neat lettering if you’re not confident freehanding.
- Add glow-in-the-dark paint or LED strips around the edges for a nighttime glow.
- Vary sizes for a realistic cemetery look—mix tall and short tombstones.
Challenges and Solutions
- Problem: Foam can crumble when cut.
- Solution: Seal edges with mod podge before painting to strengthen them.
I made a set of five tombstones last year, and they held up through rain and wind. They’re reusable too—just store them flat in your garage.
2. Cardboard Coffins

What They Are
Turn old cardboard boxes into creepy coffins for a dramatic graveyard prop. These are great as standalone pieces or with skeletons popping out.
Materials
- Large cardboard boxes (free from appliance stores or moving supplies)
- Black acrylic paint ($2)
- Red fabric scraps for lining ($3)
- Hot glue gun ($5 if you don’t have one)
How to Make Them
- Find a large box and cut it into a coffin shape—narrow at the feet, wider at the shoulders.
- Paint the outside black. Let it dry completely.
- Line the inside with red fabric scraps, gluing them in place for a plush look.
- Add fake bones or a plastic skull inside for extra spookiness.
- Place the coffin on the ground, propped slightly open with a stick.
Tips for Customization
- Add hinges (from a hardware store) for an opening lid.
- Position a skeleton halfway out for a “rising dead” effect.
- Use recycled appliance boxes to keep costs at zero.
Challenges and Solutions
- Problem: Cardboard gets soggy in rain.
- Solution: Cover with clear plastic sheeting or move under a porch during storms.
My neighbor thought my coffin was store-bought! It’s a showstopper, especially when paired with fog effects.
3. Groundbreaker Zombie Hands

What They Are
These creepy hands look like zombies clawing out of the ground. They’re simple to make and add a chilling touch to your graveyard.
Materials
- Plastic gloves ($1 for a pack)
- Newspaper (free)
- Plaster or papier-mâché mix ($5)
- Green or gray paint ($2)
- Wooden stakes ($2)
How to Make Them
- Stuff plastic gloves with crumpled newspaper to form hands.
- Mix plaster or papier-mâché and coat the gloves. Let them dry for 24 hours.
- Paint the hands green or gray, adding black for a decayed look.
- Attach stakes to the wrists with hot glue.
- Bury the hands partially in the dirt, leaving fingers exposed.
Tips for Customization
- Brush on glow-in-the-dark paint for a nighttime effect.
- Group hands in clusters for a zombie horde vibe.
- Try animal paws or skeletal hands for variety.
Challenges and Solutions
- Problem: Hands tip over in wind.
- Solution: Use longer stakes and bury them deeper.
These hands freaked out my mail carrier last Halloween—she thought they were real for a second!
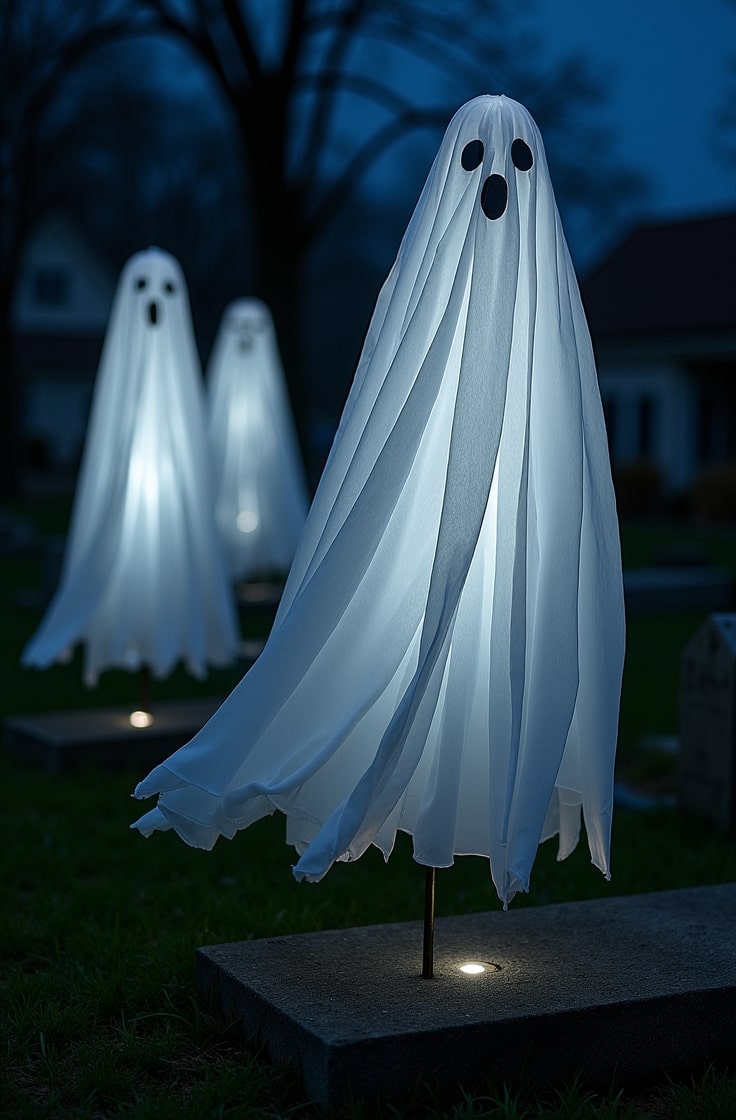
4. Ghostly Sheet Figures

What They Are
Flowing ghost figures add an ethereal feel, floating above your graves. They’re easy to make and look amazing at night.
Materials
- White bedsheets ($3 at thrift stores)
- Chicken wire or PVC pipes ($5)
- Fishing line ($2)
- Small fan (optional, $10)
How to Make Them
- Shape chicken wire or PVC into a ghost form—think head and arms.
- Drape a white sheet over the frame, letting it flow naturally.
- Secure the sheet with fishing line to keep it in place.
- Hang from a tree branch or stake it in the ground.
- Add a small fan underneath for movement if you want.
Tips for Customization
- Use cheesecloth instead of sheets for a transparent look.
- Place an LED light below for a glowing effect.
- Draw friendly faces with markers for a kid-safe version.
Challenges and Solutions
- Problem: Sheets tangle in wind.
- Solution: Secure edges with small clips or weights.
My kids loved helping with these ghosts, and they look magical swaying in the breeze.
5. Skeleton Poses

What They Are
Plastic skeletons arranged in funny or scary poses bring personality to your graveyard. Think skeletons digging graves or playing cards.
Materials
- Plastic skeletons ($5 at dollar stores)
- Wire ($2)
- Props like shovels or lanterns ($3)
How to Make Them
- Buy a cheap plastic skeleton from a dollar store.
- Pose it in a scene—like digging with a shovel or sitting on a tombstone.
- Secure joints with wire to hold the pose.
- Add props to complete the scene (e.g., a lantern in hand).
- Place among tombstones for context.
Tips for Customization
- Create a “skeleton party” with multiple figures.
- Dress them in old clothes for extra character.
- These are reusable year after year.
Challenges and Solutions
- Problem: Skeletons are fragile and break easily.
- Solution: Reinforce joints with hot glue before posing.
I set up a skeleton “gardener” last year, and kids loved taking selfies with it.
6. Eerie Fog Machine Setup

What They Are
A low-lying fog effect makes your graveyard feel like a misty horror movie set. You can build a DIY version or buy a cheap one.
Materials
- DIY fog machine (plastic container, dry ice, fan, $15) or store-bought ($25)
- Extension cord ($5)
- Water and food coloring (free)
How to Make Them
- For DIY: Fill a container with warm water and a drop of food coloring.
- Add dry ice for fog (handle with gloves!).
- Place a small fan to direct the fog across your graveyard.
- Hide the setup behind a tombstone or bush.
- For store-bought: Follow instructions and position low to the ground.
Tips for Customization
- Use a timer to control fog bursts.
- Add colored LED lights to tint the fog.
- Ensure good ventilation for safety.
Challenges and Solutions
- Problem: Fog dissipates quickly.
- Solution: Use a fog chiller (PVC pipe with ice) to keep it low.
The fog was the star of my graveyard last year—neighbors kept asking how I did it!
7. Spider Web Draping

What They Are
Cobwebs stretched across tombstones and fences add a creepy, abandoned feel. They’re cheap and quick to set up.
Materials
- Cotton batting or store-bought webs ($3)
- Plastic spiders ($1)
- Hot glue ($2)
How to Make Them
- Pull cotton batting into thin, wispy strands.
- Drape it over tombstones, fences, or bushes.
- Glue plastic spiders onto the webs.
- Stretch webs to look natural, not clumped.
- Check from a distance to ensure even coverage.
Tips for Customization
- Layer webs for a thicker, creepier effect.
- Use UV paint on spiders for a glowing look.
- Pair with LED spotlights to highlight webs at night.
Challenges and Solutions
- Problem: Webs blow away in wind.
- Solution: Pin them down with staples or small rocks.
These webs made my graveyard look like it’s been untouched for centuries.
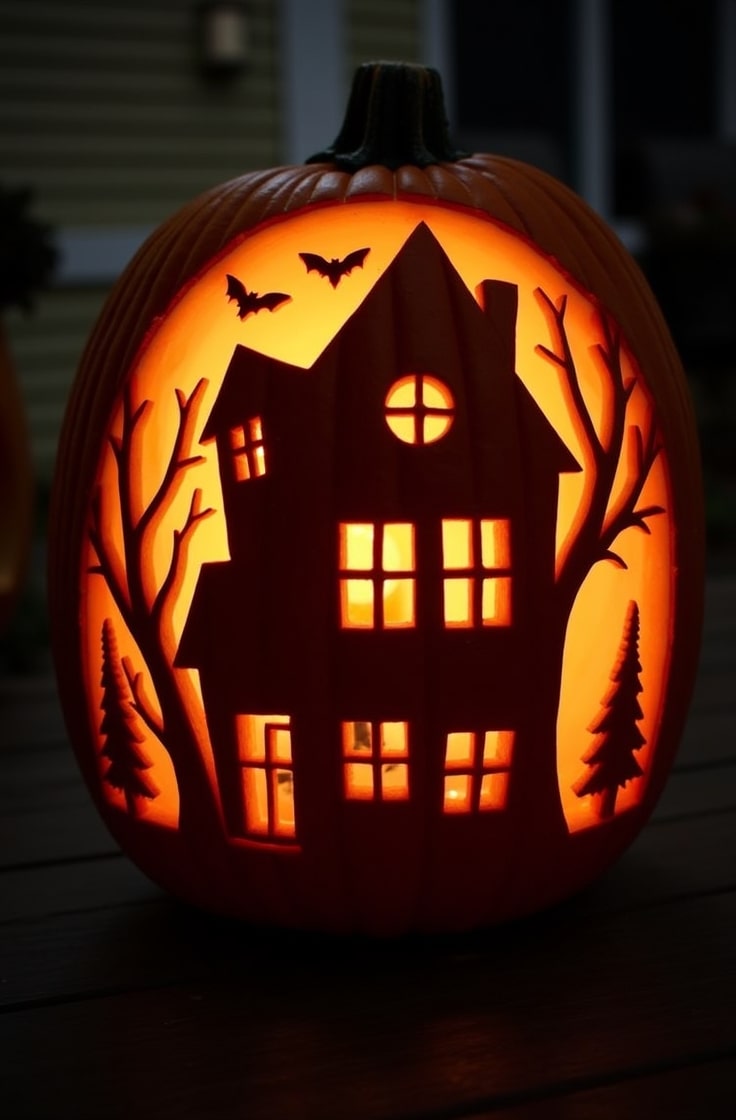
8. Carved Pumpkin Graves

What They Are
Pumpkins carved with graveyard designs double as tombstones or spooky lanterns, adding warmth to your setup.
Materials
- Pumpkins ($5 each)
- Carving tools ($3)
- Tea lights ($2)
How to Make Them
- Pick medium-sized pumpkins for easy carving.
- Carve designs like “RIP” or skull faces.
- Place pumpkins on mounded dirt to mimic graves.
- Add tea lights inside and light them at dusk.
- Arrange in rows or clusters for effect.
Tips for Customization
- Soak pumpkins in bleach water to slow rotting.
- Use fake pumpkins for a reusable option.
- Roast the seeds for a post-Halloween snack.
Challenges and Solutions
- Problem: Pumpkins rot quickly.
- Solution: Carve closer to Halloween or use artificial ones.
These pumpkins added a cozy glow to my graveyard, perfect for evening visitors.
9. Graveyard Fencing

What They Are
A rustic fence defines your graveyard, making it feel like a contained, eerie space. It’s simple and adds structure.
Materials
- Wooden stakes ($5 for a pack)
- Twine or chicken wire ($3)
- Black spray paint ($2)
How to Make Them
- Hammer stakes into the ground around your graveyard area.
- Wrap twine or chicken wire between stakes to form a fence.
- Spray paint the fence black for an aged look.
- Add a sign like “Enter if You Dare” for fun.
- Space stakes evenly for a polished look.
Tips for Customization
- Wrap fake vines around the fence for an overgrown effect.
- Use portable stakes for easy storage.
- Paint signs with glow-in-the-dark paint.
Challenges and Solutions
- Problem: Uneven ground makes stakes wobbly.
- Solution: Cut stakes to different lengths to adjust.
My fence made the graveyard feel like a real cemetery—super immersive!
10. Mummy-Wrapped Statues

What They Are
Turn yard items like planters or statues into mummies guarding your graves. It’s a fun, quick project kids love.
Materials
- Gauze or toilet paper ($2)
- Hot glue ($2)
- Googly eyes ($1)
How to Make Them
- Pick a yard item like a planter or gnome.
- Wrap it loosely with gauze or toilet paper.
- Glue the ends to secure the wrap.
- Stick googly eyes peeking out of the wraps.
- Position near graves for a guarding effect.
Tips for Customization
- Spray with clear sealant for weatherproofing.
- Pose with outstretched arms for drama.
- Let kids wrap for a family activity.
Challenges and Solutions
- Problem: Paper tears in wind.
- Solution: Use fabric strips instead of toilet paper.
My old garden gnome became the creepiest mummy last Halloween!
11. Sound Effect Stations

What They Are
Hidden speakers playing spooky sounds like moans or chains add atmosphere. It’s a high-impact, low-effort addition.
Materials
- Bluetooth speaker ($10)
- Free sound apps (search online)
- Batteries ($3)
How to Make Them
- Download free spooky sound effects (moans, chains, wind).
- Connect a Bluetooth speaker to your phone.
- Hide the speaker in a bush or behind a tombstone.
- Play sounds on a loop or use a motion sensor.
- Test volume to avoid disturbing neighbors.
Tips for Customization
- Create a playlist with varied sounds.
- Adjust volume for different times of night.
- Pair with visuals like ghosts or fog.
Challenges and Solutions
- Problem: Batteries die quickly.
- Solution: Use solar-powered speakers or rechargeables.
The howling wind sounds made my graveyard feel alive (or undead!).
12. Witch’s Cauldron Brew

What They Are
A bubbling cauldron at your graveyard’s entrance adds a magical, spooky touch. It’s a great photo op too.
Materials
- Large pot ($5 from thrift stores)
- Dry ice ($10)
- Colored water (free with food coloring)
- LED lights ($3)
How to Make Them
- Fill a pot with water and a few drops of green food coloring.
- Add dry ice with tongs for a bubbling effect.
- Place LED lights under the pot for a glowing brew.
- Set at the graveyard entrance for maximum impact.
- Refill water as needed during the night.
Tips for Customization
- Float “eyeballs” (peeled grapes) in the brew.
- Add scented oils for a witchy smell.
- Safe for kids to admire from a distance.
Challenges and Solutions
- Problem: Dry ice is tricky to handle.
- Solution: Use gloves and tongs; store safely.
This cauldron was a hit with trick-or-treaters—they loved the bubbling!
13. Illuminated Grave Markers

What They Are
Glowing crosses or signs light up your graveyard at night, making it visible and spooky from the street.
Materials
- Wood scraps (free from pallets)
- Solar lights ($5)
- Reflective tape ($2)
How to Make Them
- Cut wood into cross or sign shapes.
- Attach solar lights to the top with hot glue.
- Add reflective tape for extra shine.
- Stake into the ground near tombstones.
- Test lights at dusk to ensure they work.
Tips for Customization
- Paint crosses in theme colors (black, white).
- Use solar lights for energy efficiency.
- Line pathways with markers for a guided tour.
Challenges and Solutions
- Problem: Lights fail at night.
- Solution: Keep backup batteries ready.
These markers guided guests through my graveyard like a spooky trail.
Budget Breakdown
Each idea stays under $50, with most costing $10-$20. Source materials from dollar stores, thrift shops, or your garage. Cardboard, wood scraps, and old sheets are often free. Dry ice and foam sheets are the priciest items, but you can split costs by sharing with neighbors. I spent about $150 total last year for a full graveyard setup, and it was worth every penny.
Setup and Teardown Guide
Setup
- Sketch your layout on paper. Mark spots for tombstones, props, and lights.
- Set up big items like coffins and fences first.
- Add smaller props like hands and webs.
- Test lights and sounds in the evening.
- Secure everything with stakes or weights.
Teardown
- Remove delicate items like webs and sheets first.
- Store tombstones and coffins flat in a dry place.
- Charge or store batteries for next year.
- Clean and pack reusable props like skeletons.
I store everything in labeled bins, making next year’s setup a breeze.
Safety and Legal Notes
Check your neighborhood rules—some HOAs limit yard displays. Use non-toxic paints and materials, especially if kids are around. Secure props to avoid tripping or falling. Dispose of dry ice safely and recycle cardboard or wood. I always double-check stakes before Halloween night to keep everyone safe.
Final Thoughts
Creating a DIY Halloween graveyard is a blast. It’s a chance to get creative, save money, and make memories.
Whether you go all-out with fog and coffins or keep it simple with tombstones and webs, your yard will be the spookiest on the block.
Try one or two ideas this year, and add more next time. Have fun, stay safe, and happy haunting!

Emily Harper is a kitchen decor expert and interior designer with a passion for creating stylish, functional spaces. As a busy mom, she understands the importance of a kitchen that works for both family life and design. With 6 years of experience, Emily specializes in transforming kitchens into inviting, practical spaces. She’s known for her ability to blend trends with everyday needs, helping families create kitchens that feel like the heart of the home.