9 Fun & Easy Halloween Wood Sign Ideas
Halloween wood signs are a simple yet striking way to bring spooky charm to your home or yard.
Whether you’re painting witty phrases, carving eerie silhouettes, or distressing wood for a rustic look, these signs can fit any style—from farmhouse cozy to haunted house creepy.

They’re budget-friendly, easy to customize, and perfect for both beginners and seasoned makers. Plus, you can reuse them year after year with a quick refresh.
In this guide, I’ll share creative Halloween wood sign ideas that are not only fun to make but also sure to catch every trick-or-treater’s eye.
Stick around—you might just find your next favorite project.
Table of Contents
- 9 Halloween Wood Sign Ideas to Inspire You
- Step-by-Step Creation Guide
- Wrapping It Up
- Frequently Asked Questions
9 Halloween Wood Sign Ideas to Inspire You
Let’s get to the good stuff: nine Halloween wood sign ideas that will make your home the spookiest on the block. Each idea includes a description, style, how to make it, where to display it, and the skill level needed. I’ve made sure there’s something for everyone, so grab your supplies and let’s get crafting!
1. “Boo” Ghost Sign
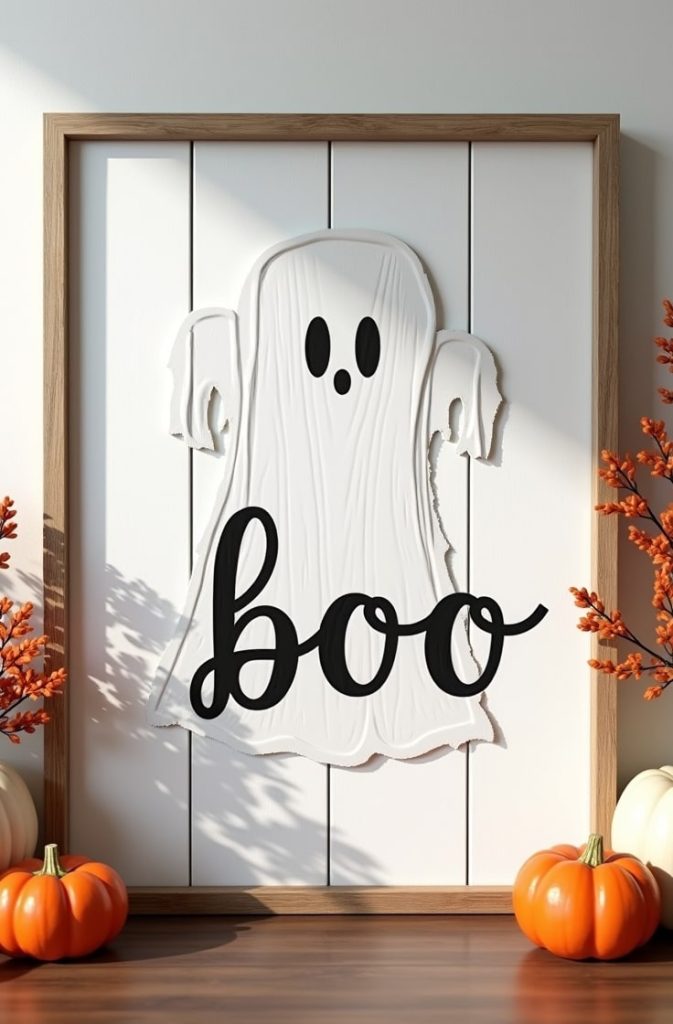
This first idea is perfect if you’re just starting out. The “Boo” ghost sign is a cute, family-friendly design that’s super easy to make. It features the word “Boo” with a little ghost graphic, bringing a playful vibe to your Halloween decor.
Style: Playful and family-friendly. This sign is great for homes with kids or anyone who loves a lighthearted Halloween look.
How to Make It: Start with a small wood plank or a piece of plywood, about 12×18 inches. Sand the edges for a smooth finish. Paint the board white to create a ghostly background. Once it’s dry, use a stencil or freehand the word “Boo” in bold black letters. Add a simple ghost shape next to it—think a rounded triangle with two black dots for eyes. For a rustic touch, lightly sand the edges after painting to give it a worn look. Seal with a clear coat if you plan to display it outside.
Placement: This sign looks adorable on your entryway table, a mantel, or even hanging on your front door. It’s small enough to fit anywhere but big enough to make a statement.
Skill Level: Beginner. You don’t need fancy tools or skills—just a steady hand and some paint.
2. Spooky Silhouette Sign
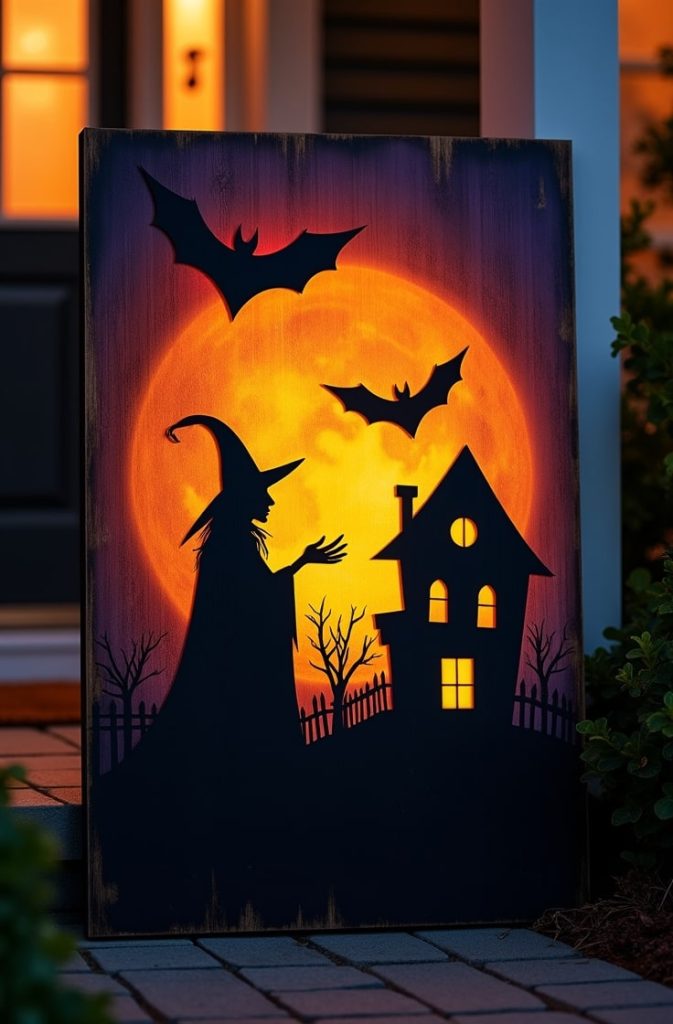
If you’re craving something a bit creepier, the spooky silhouette sign is the way to go. This sign features black silhouettes of bats, witches, or haunted houses set against a glowing moonlit background. It’s perfect for setting an eerie mood.
Style: Gothic and eerie. This design leans into the spooky side of Halloween without being too scary.
How to Make It: Grab a larger wood board, about 18×24 inches. Paint the background in a gradient of orange and purple to mimic a sunset or moonlit sky. You can blend the colors with a sponge for a smooth transition. Once dry, use vinyl decals for silhouettes of bats, a witch on a broom, or a haunted house. If you’re feeling artistic, you can hand-paint the silhouettes with black acrylic paint. Add a small yellow circle for the moon to tie it all together. Seal it for outdoor use.
Placement: This sign shines on your front porch or in your yard, especially if you add a spotlight to highlight the silhouettes at night.
Skill Level: Intermediate. You’ll need some patience for painting the background and applying decals or painting silhouettes.
3. “Trick or Treat” Welcome Sign

Nothing says Halloween like welcoming trick-or-treaters with a cheerful “Trick or Treat” sign! This design is bright, bold, and perfect for getting everyone in the Halloween spirit.
Style: Festive and inviting. It’s all about creating a warm, welcoming vibe for your neighborhood ghouls and goblins.
How to Make It: Use a rectangular wood plank, about 10×24 inches. Paint the board in a bright color like orange or black. Use a stencil to paint “Trick or Treat” in large, playful letters—white or yellow works great for contrast. Add small accents like candy corn, pumpkins, or spider webs in the corners. You can use stencils for these too, or draw them freehand if you’re feeling confident. Finish with a clear sealant for outdoor durability.
Placement: Hang this on your front door or prop it on your porch next to a bowl of candy. It’s a must-have for trick-or-treat night!
Skill Level: Beginner. Stencils make this project super easy, even if you’re new to crafting.
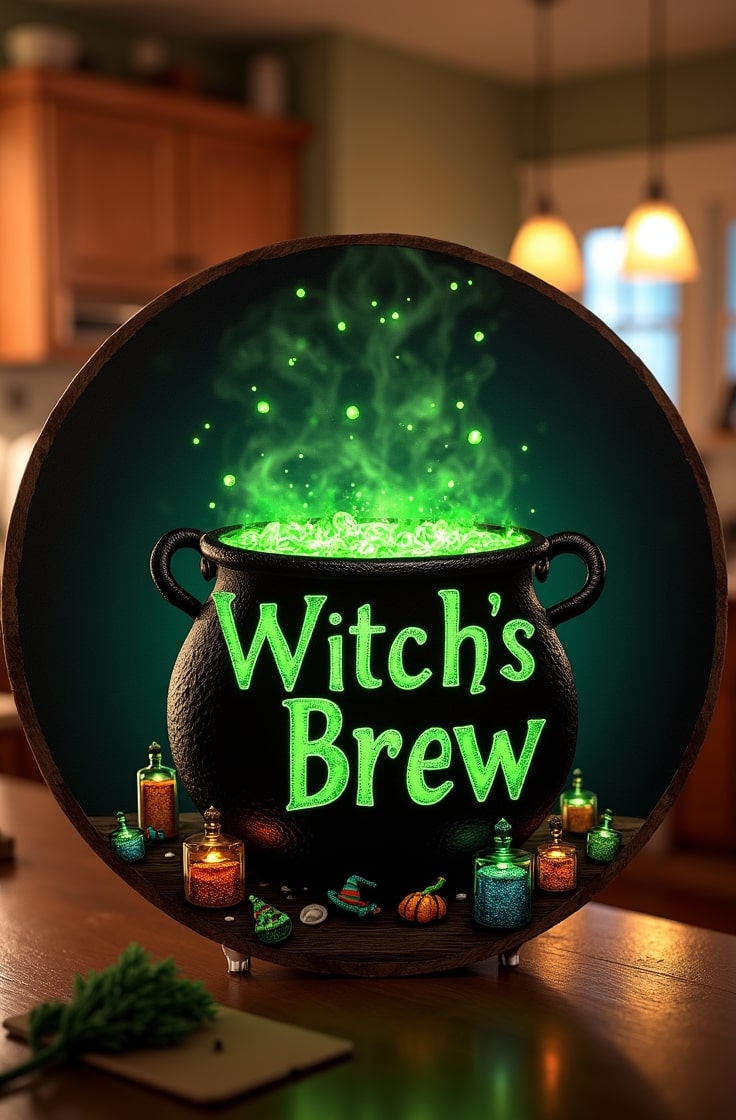
4. Witch’s Brew Cauldron Sign

This witchy sign is all about magic and mystery. It features a bubbling cauldron with the phrase “Witch’s Brew” or a spell-like quote, perfect for adding a mystical touch to your decor.
Style: Mystical and whimsical. It’s great for fans of witches and potions.
How to Make It: Start with a round or rectangular wood board, about 16×16 inches. Paint a black cauldron in the center, then add green “bubbling” effects with a sponge or brush. Use metallic paint (like silver or gold) for highlights to make the cauldron pop. Add the phrase “Witch’s Brew” with a vinyl decal or stencil in a spooky font. If you want to get creative, paint small potion bottles or a witch’s hat around the edges. Seal it for indoor or outdoor use.
Placement: This sign is perfect for your kitchen or a Halloween party setup, especially near a drink station or snack table.
Skill Level: Intermediate. The painting details require a bit of care, but it’s doable with practice.
5. Haunted House Directional Sign
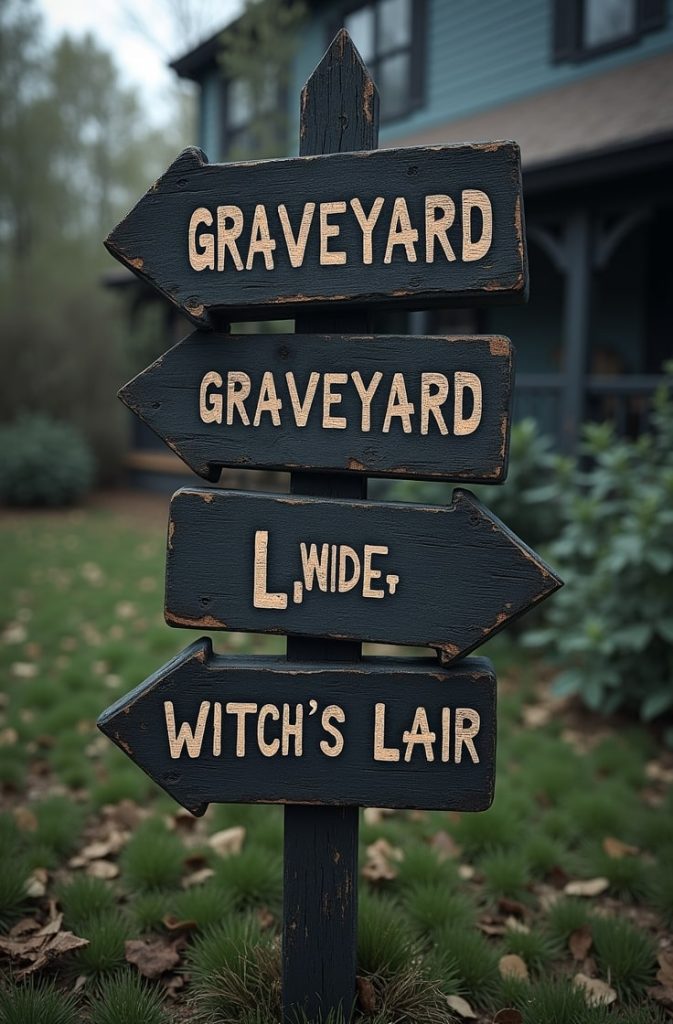
Want to create a spooky scene? This haunted house directional sign is a showstopper. It’s made of multiple boards with arrows pointing to creepy locations like “Graveyard” or “Witch’s Lair.”
Style: Creepy and immersive. This sign feels like it belongs in a haunted village.
How to Make It: Gather three to five small wood boards, each about 6×18 inches. Paint each board a different color (black, gray, or brown work well). Use a stencil or vinyl decals to add phrases like “Graveyard 5 Miles,” “Witch’s Lair,” or “Haunted House.” Paint an arrow next to each phrase, pointing in different directions. Distress the edges with sandpaper for an aged, creepy look. Stack the boards vertically and attach them to a wooden post with screws or glue. Seal it for outdoor use.
Placement: Stick this in your front yard or garden to guide guests to your Halloween festivities.
Skill Level: Advanced. Assembling multiple boards and creating a cohesive design takes some skill, but the result is worth it.
6. Pumpkin Patch Sign
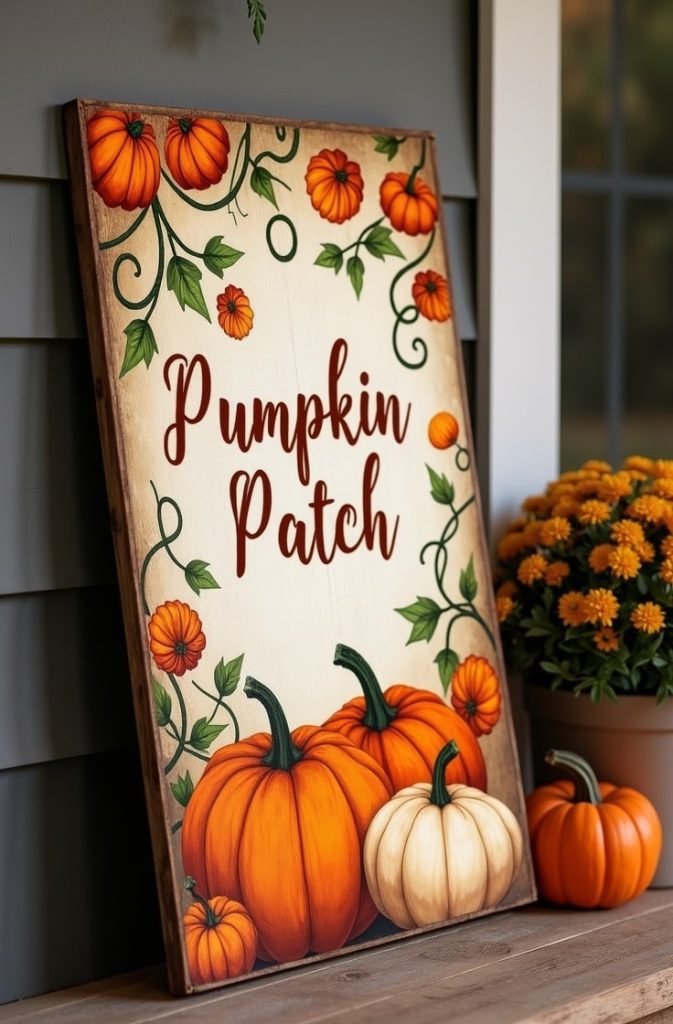
For a cozy, autumnal vibe, the pumpkin patch sign is a must. It features a painted pumpkin patch scene with the phrase “Pumpkin Patch” or “Happy Harvest.”
Style: Cozy and autumnal. This sign brings the warmth of fall to your Halloween decor.
How to Make It: Use a rectangular wood board, about 12×24 inches. Paint a background in a soft color like cream or light orange. Add pumpkins in various sizes using orange and white paint. Paint green vines curling around the pumpkins for a realistic touch. Use a stencil to add “Pumpkin Patch” or “Happy Harvest” in a warm brown or black font. Distress the edges lightly for a rustic feel. Seal if you’re displaying it outside.
Placement: This sign looks great on your porch, in your living room, or near a fall-themed display with real pumpkins.
Skill Level: Intermediate. The pumpkin designs require some painting skills, but stencils can simplify the text.
7. “Beware” Warning Sign
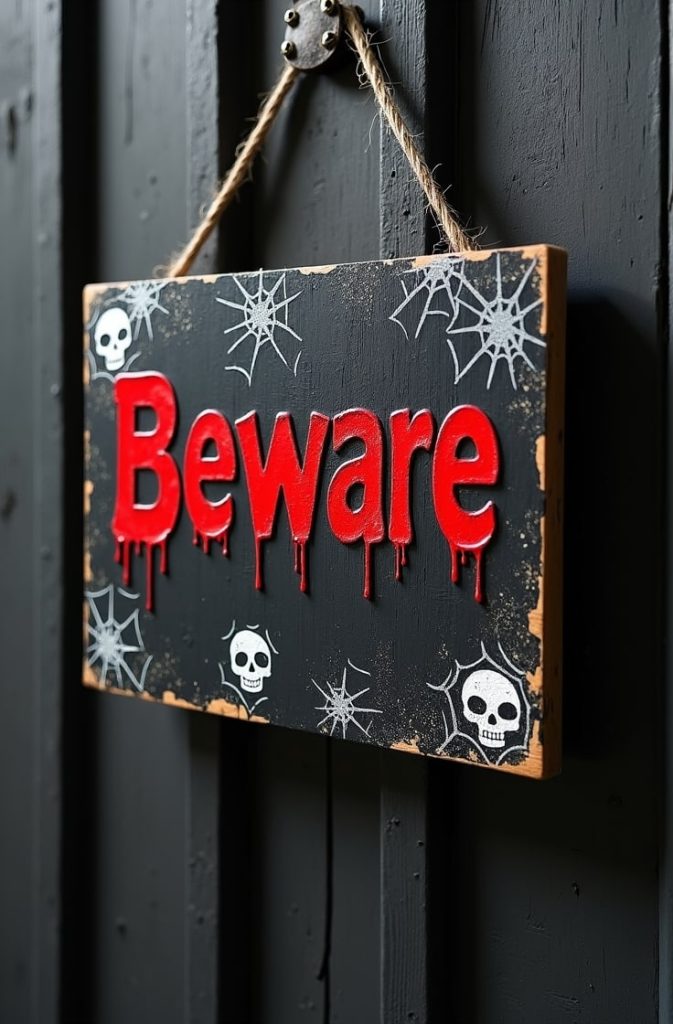
If you want to spook your guests, the “Beware” warning sign is the way to go. With dripping red paint and creepy motifs like skulls or spiders, this sign screams Halloween.
Style: Scary and dramatic. It’s perfect for setting a chilling mood.
How to Make It: Start with a square or rectangular board, about 14×14 inches. Paint the board black or dark gray. Use red paint to create the word “Beware” in a bold, dripping style—let the paint run slightly for effect. Add stenciled skulls, spiders, or cobwebs in white or silver around the edges. Distress the board with sandpaper for a weathered look. Seal it for outdoor use.
Placement: Hang this on your front gate or in your hallway to give guests a spooky welcome.
Skill Level: Beginner. The dripping paint effect is forgiving, so it’s great for new crafters.
8. Day of the Dead Skull Sign
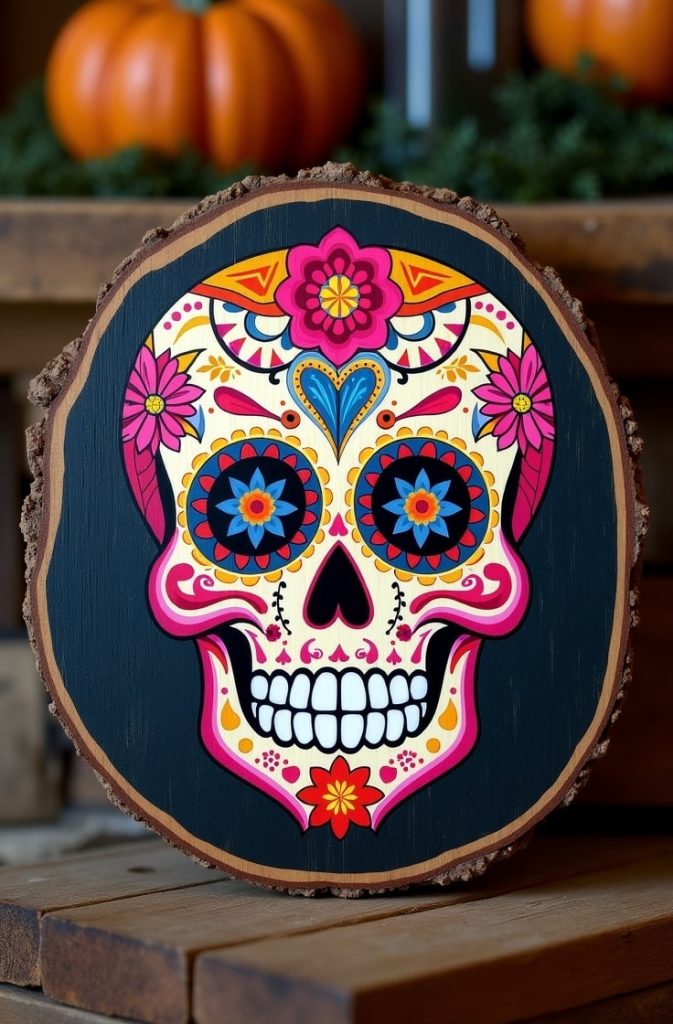
Inspired by Día de los Muertos, this vibrant sugar skull sign is a colorful addition to your Halloween decor. It’s a beautiful way to celebrate the season with a cultural twist.
Style: Cultural and artistic. This sign is bold and eye-catching.
How to Make It: Use a round or square wood board, about 16×16 inches. Paint a sugar skull in the center with bright colors like pink, yellow, and blue. Add floral patterns, hearts, or swirls around the skull using a fine brush or wood-burning tool for extra detail. Paint the background black or white to make the colors pop. Use a stencil to add “Día de los Muertos” or leave it as a graphic-only design. Seal for durability.
Placement: Display this indoors on a mantel or as part of a Halloween party setup.
Skill Level: Advanced. The detailed painting and optional wood-burning require some experience.
9. Vintage Halloween Quote Sign
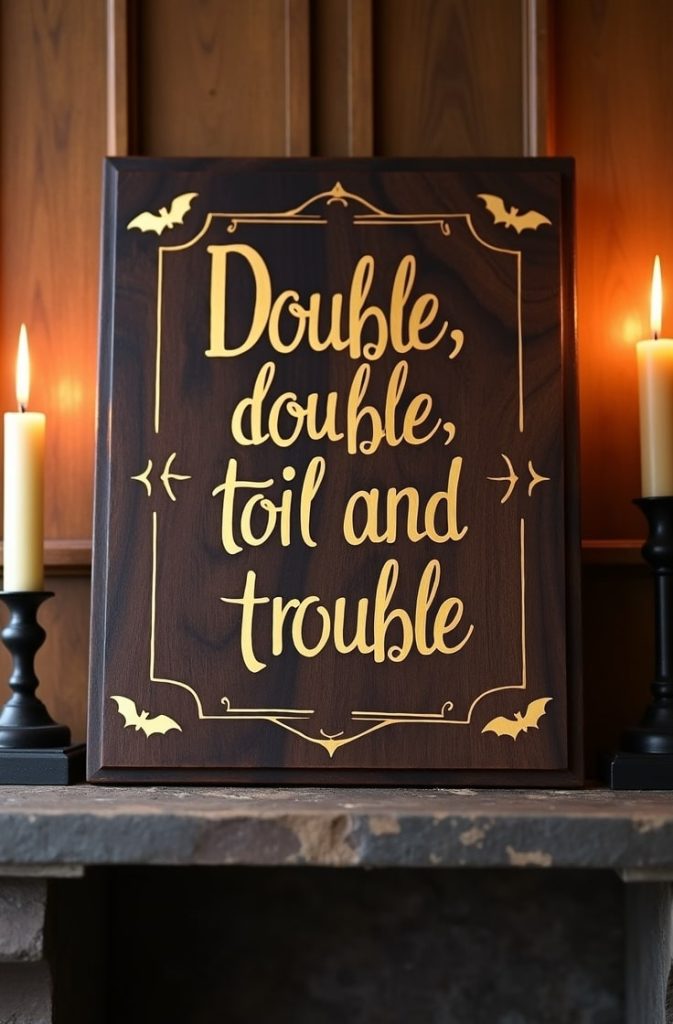
For a touch of elegance, try a vintage Halloween quote sign. Featuring a classic quote like “Double, double, toil and trouble” in beautiful calligraphy, this sign is perfect for literary fans.
Style: Sophisticated and literary. It’s a classy take on Halloween decor.
How to Make It: Start with a rectangular wood board, about 12×20 inches. Stain the wood in a dark walnut or oak shade for a vintage look. Use a wood-burning tool to etch the quote “Double, double, toil and trouble” in elegant calligraphy. If wood-burning isn’t your thing, use a vinyl decal in a cursive font. Add small flourishes like bats or stars in the corners. Seal with a clear coat for a polished finish.
Placement: This sign looks stunning on a fireplace mantel or in your dining room.
Skill Level: Intermediate. Wood-burning takes practice, but vinyl decals make it easier.
Step-by-Step Creation Guide
Ready to start crafting? Here’s a simple step-by-step guide that works for all the signs above:
- Choose Your Design: Pick one of the nine ideas and gather your materials.
- Prepare the Wood: Sand the surface and edges for a smooth finish. Cut the wood to size if needed.
- Apply a Base Coat: Paint or stain the board in your chosen color. Let it dry completely.
- Add Your Design: Use stencils, vinyl decals, or freehand painting for text and graphics. Take your time to get it right.
- Seal the Sign: Apply a clear sealant for durability, especially for outdoor signs.
Tips for Success:
- Practice your designs on paper first to build confidence.
- Use painter’s tape for clean, straight lines when painting.
- Test paint colors on a scrap piece of wood to ensure they look good together.
Wrapping It Up
There you have it—nine Halloween wood sign ideas to make your home festive and fun!
From the playful “Boo” ghost sign to the elegant vintage quote sign, there’s something here for every style and skill level.
Whether you’re a beginner looking for an easy project or an advanced crafter ready to tackle a directional sign, these ideas will bring your Halloween decor to life.
So, grab your supplies, pick a design, and start crafting. I can’t wait to see what you create! Share your spooky signs on social media and inspire others to get in on the fun. Halloween is all about creativity, so let your imagination run wild.
Frequently Asked Questions
What type of wood is best for signs? Plywood or pine is great for beginners because they’re affordable and easy to work with. For outdoor signs, cedar or oak is more durable.
Can I make these without power tools? Absolutely! Buy pre-cut wood from a craft store or use hand tools like a handsaw for simple cuts.
How do I weatherproof outdoor signs? Apply a polyurethane or outdoor sealant after painting. This protects your sign from rain and sun.
Where can I buy supplies? Craft stores like Michaels, hardware stores like Home Depot, or online retailers like Amazon have everything you need.
How long does each project take? Beginner projects take about 1-3 hours. Intermediate and advanced designs might take 5 hours or more, depending on details.
Happy crafting, and have a spooktacular Halloween!

Emily Harper is a kitchen decor expert and interior designer with a passion for creating stylish, functional spaces. As a busy mom, she understands the importance of a kitchen that works for both family life and design. With 6 years of experience, Emily specializes in transforming kitchens into inviting, practical spaces. She’s known for her ability to blend trends with everyday needs, helping families create kitchens that feel like the heart of the home.