15 Christmas Craft Ideas to Make Your Holidays Special
Christmas isn’t just about decorating—it’s about making. Handmade crafts add personality and warmth to your holiday.

Paper ornaments, DIY wreaths, painted stockings, or simple wood projects can turn any corner festive. These are budget-friendly, personal, and fun to make with family or friends.
This guide shares 15 Christmas Craft Ideas that are easy, stylish, and practical. No complicated steps, no wasted time—just creative projects that bring holiday cheer to your home.
Let’s start crafting.
Table of Contents
- Getting Started with Christmas Crafts
- 15 Christmas Craft Ideas
- 1. Paper Snowflakes
- 2. Mason Jar Snow Globes
- 3. Felt Christmas Ornaments
- 4. Pinecone Christmas Trees
- 5. Handmade Christmas Cards
- 6. Salt Dough Ornaments
- 7. Reindeer Cork Figures
- 8. Christmas Wreath
- 9. Glittery Candle Holders
- 10. Santa Hat Chair Covers
- 11. Beaded Snowflake Ornaments
- 12. Pom-Pom Garland
- 13. Wooden Snowman Figures
- 14. Knitted Christmas Stockings
- 15. Cinnamon Stick Ornaments
- Tips for Success
- Conclusion
Getting Started with Christmas Crafts
Why Craft for Christmas?
I love crafting because it’s fun and meaningful. You save money by making your own decorations and gifts.
Plus, handmade items feel so personal. Crafting with family or friends creates memories that last a lifetime. It’s also a great way to relax during the busy holiday season.
Every snip of scissors or dab of glue brings a little festive cheer. You’ll feel proud seeing your creations light up your home or bring smiles to loved ones.
Preparation Tips
Before you start, gather some basic supplies. You’ll need scissors, glue, paper, ribbons, and paint. These are easy to find at dollar stores or craft shops.
You can also recycle household items like jars, corks, or old fabric. I always check my home for materials before buying new ones. It saves money and sparks creativity. If kids are crafting with you, keep safety in mind.
Use child-safe scissors and non-toxic glue. Set up a clean workspace with plenty of room. A little prep makes crafting smooth and fun.
Crafting Skill Levels
This article includes crafts for everyone. Beginners can try simple projects like paper snowflakes. Intermediate crafters might enjoy sewing felt ornaments.
Advanced crafters can tackle knitting or beaded designs. Don’t worry if a project feels tricky—I’ve included tips to simplify each one.
You can adjust any craft to match your skills. The goal is to have fun and create something you love.
15 Christmas Craft Ideas
Here are 15 crafts to make your Christmas merry and bright. Each one includes a description, materials, time estimate, skill level, and use. Let’s get crafting!
1. Paper Snowflakes

Nothing says winter like paper snowflakes. They’re so easy to make. You fold paper, cut out patterns, and unfold a unique snowflake. I love hanging them on windows or stringing them into garlands. They add a magical touch to any room.
- Materials: White paper, scissors, optional glitter.
- Time: 15–30 minutes.
- Skill Level: Beginner (great for kids).
- Use: Window decor, garlands.
Grab some white paper and fold it into a triangle. Fold it a few more times to make a smaller triangle. Cut small shapes along the edges—triangles, circles, or swirls. Unfold carefully to reveal your snowflake. Sprinkle glitter for extra sparkle. Kids love this craft, and it’s a great way to practice cutting skills. Hang your snowflakes with tape or thread for a festive look.
2. Mason Jar Snow Globes

I adore snow globes. Making them with mason jars is so fun. You glue a small figurine inside the lid, add glitter and water, and seal it up. Shake it, and you’ve got a winter wonderland.
- Materials: Mason jar, glycerin, glitter, small figurines, glue.
- Time: 1 hour.
- Skill Level: Intermediate.
- Use: Table centerpiece, gift.
Find a small figurine, like a tree or snowman. Glue it to the inside of the jar lid. Fill the jar with water and a teaspoon of glycerin. Add a pinch of glitter. Screw the lid on tightly. Flip the jar upside down, and shake gently. The glitter swirls like snow. These make great gifts or table decor. Be careful with the glue to avoid leaks.
3. Felt Christmas Ornaments

Felt ornaments are cozy and cute. You cut shapes like stars or trees from felt, stitch them together, and add stuffing. I love how soft and colorful they look on my tree.
- Materials: Felt sheets, needle, thread, stuffing, beads.
- Time: 1–2 hours.
- Skill Level: Intermediate.
- Use: Tree ornaments, gift tags.
Cut two identical shapes from felt, like a star or stocking. Stitch them together with a simple running stitch, leaving a small gap. Stuff with cotton or fabric scraps. Sew the gap closed. Add beads for eyes or decorations. If sewing feels hard, use fabric glue instead. These ornaments are perfect for gifting or decorating.
4. Pinecone Christmas Trees

Pinecones make adorable mini Christmas trees. You paint them green, add beads, and set them in tiny pots. I love placing these on my dining table for a rustic touch.
- Materials: Pinecones, green paint, beads, glue, small pots.
- Time: 45 minutes.
- Skill Level: Beginner.
- Use: Table decor, party favors.
Collect pinecones from your yard or a park. Paint them green with acrylic paint. Let them dry. Glue colorful beads as “ornaments.” Place each pinecone in a small pot or cup. You can add a star bead on top for extra charm. These are quick, easy, and look so festive.
5. Handmade Christmas Cards

Making your own cards feels so special. You fold cardstock, add designs with markers or stickers, and write a heartfelt message. I love sending these to friends and family.
- Materials: Cardstock, markers, stickers, ribbon.
- Time: 30–60 minutes.
- Skill Level: Beginner.
- Use: Gifts, mailed greetings.
Fold a piece of cardstock in half. Draw a festive design, like a tree or wreath. Add stickers or tie a ribbon for flair. Write a personal message inside. Kids can help with drawing or sticking. These cards show love and care in every detail.
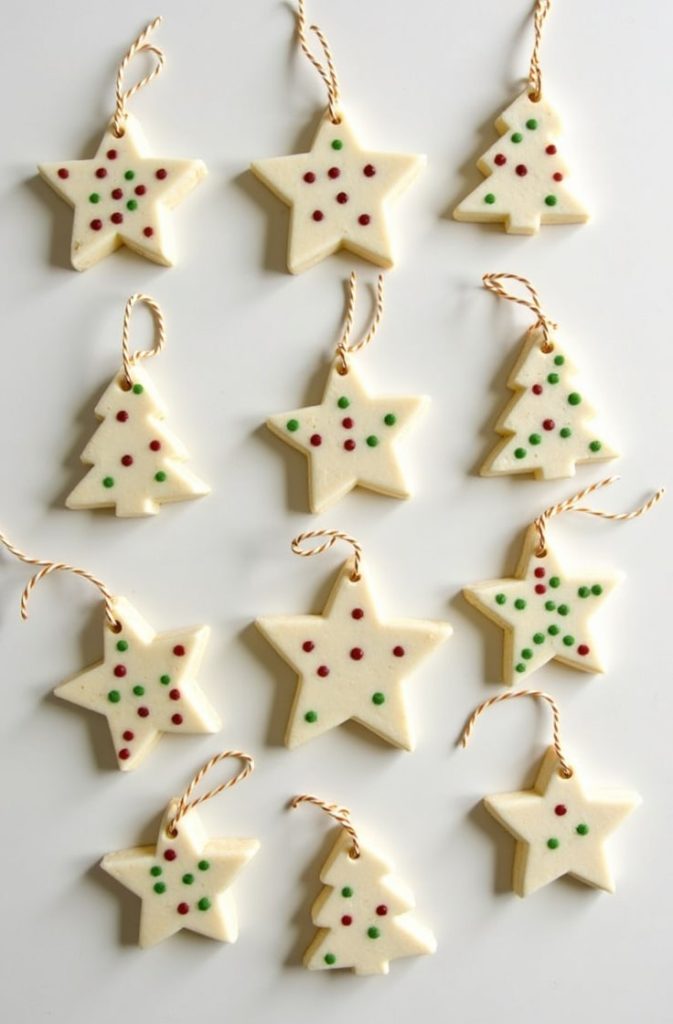
6. Salt Dough Ornaments

Salt dough ornaments are a classic. You mix dough, shape it, bake it, and paint it. I love making these with my family—they’re keepsakes we treasure for years.
- Materials: Flour, salt, water, paint, cookie cutters.
- Time: 2–3 hours (including baking).
- Skill Level: Beginner.
- Use: Ornaments, keepsakes.
Mix 1 cup flour, ½ cup water, and ½ cup salt. Roll out the dough. Use cookie cutters to make shapes like stars or bells. Poke a hole for hanging. Bake at 250°F for 2 hours. Paint when cool. Thread ribbon through the hole. These are sturdy and fun to decorate.
7. Reindeer Cork Figures

Wine corks turn into cute reindeer with a few tweaks. I love how quirky these look on my shelf. They’re a great kids’ craft too.
- Materials: Wine corks, twigs, googly eyes, glue.
- Time: 30 minutes.
- Skill Level: Beginner.
- Use: Decor, kids’ activity.
Glue two corks together to form a body and head. Break twigs into small pieces for antlers and legs. Glue them on. Add googly eyes and a red bead nose. These little reindeer are so charming and quick to make.
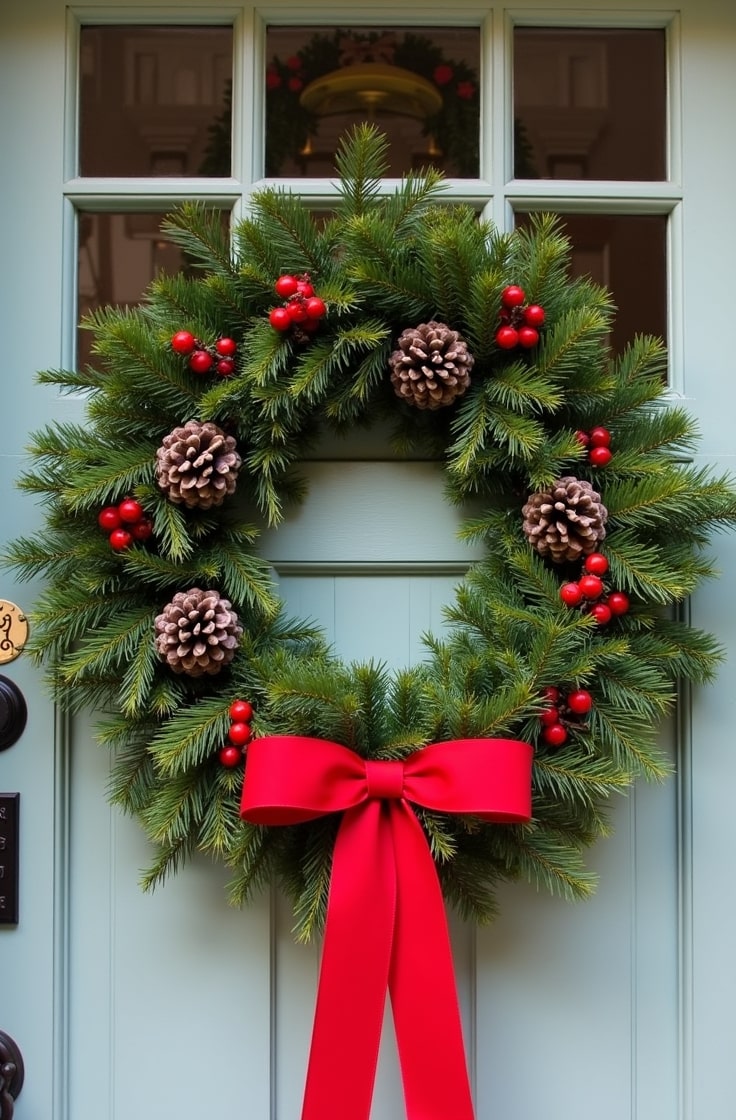
8. Christmas Wreath

A homemade wreath makes your home feel festive. You wrap yarn or greenery around a foam ring and add decorations. I hang mine on my front door every year.
- Materials: Foam ring, yarn or greenery, ribbons, ornaments.
- Time: 1–2 hours.
- Skill Level: Intermediate.
- Use: Door or wall decor.
Wrap a foam ring with green yarn or fake greenery. Secure with glue. Tie a ribbon bow at the top. Glue on small ornaments or pinecones. If you’re new to wreaths, start with yarn—it’s easier to handle. Your wreath will welcome guests with holiday cheer.
9. Glittery Candle Holders

These candle holders add sparkle to your table. You coat glass votives with glitter and mod podge. I love how they catch the light.
- Materials: Glass votives, glitter, mod podge, paintbrush.
- Time: 1 hour.
- Skill Level: Beginner.
- Use: Table decor, gifts.
Brush mod podge onto a glass votive. Sprinkle glitter over it. Let it dry. Seal with another layer of mod podge. Place a tea light inside. These holders glow beautifully and make thoughtful gifts.
10. Santa Hat Chair Covers
Santa hat chair covers are so festive. You sew mini hats from felt and slip them over chair backs. I love how they transform my dining room.
- Materials: Red and white felt, cotton balls, needle, thread.
- Time: 2 hours.
- Skill Level: Intermediate.
- Use: Dining room decor.
Cut red felt into a triangle for the hat. Sew it into a cone shape. Add a white felt strip and a cotton ball pom-pom. Slip it over a chair back. If sewing’s not your thing, use fabric glue. These covers make every meal feel like a holiday party.
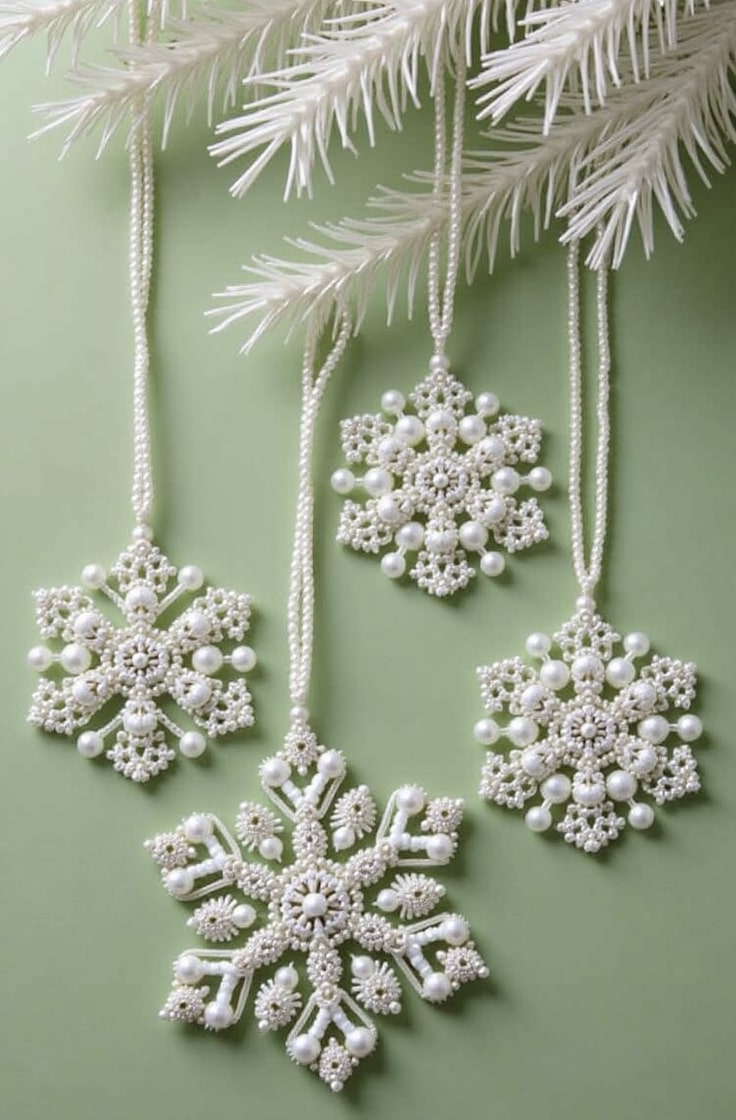
11. Beaded Snowflake Ornaments

Beaded snowflakes look delicate and fancy. You thread beads onto wire to form intricate patterns. I love hanging these on my tree for a touch of elegance.
- Materials: Beads, wire, pliers.
- Time: 1–2 hours.
- Skill Level: Advanced.
- Use: Tree ornaments, gifts.
Cut wire into six equal pieces. Thread beads in a snowflake pattern, twisting wires to secure. Use pliers to shape ends. This craft takes patience, but the result is stunning. Simplify by using fewer beads if you’re new to wirework.
12. Pom-Pom Garland

Pom-pom garlands are colorful and fun. You make fluffy pom-poms and string them together. I drape mine over my mantel for a cozy vibe.
- Materials: Yarn, pom-pom maker, string.
- Time: 1–2 hours.
- Skill Level: Beginner.
- Use: Decor, festive accents.
Wrap yarn around a pom-pom maker or cardboard. Tie it tightly and cut the loops. Fluff into a ball. Make several and thread them onto string. This craft is relaxing and perfect for beginners.
13. Wooden Snowman Figures

Wooden snowmen are so charming. You paint wooden blocks to look like snowmen and add fabric scarves. I love these on my bookshelf.
- Materials: Wooden blocks, paint, fabric scraps, glue.
- Time: 1–2 hours.
- Skill Level: Intermediate.
- Use: Shelf decor, gifts.
Paint wooden blocks white. Add black dots for eyes and buttons. Glue on an orange nose and fabric scarf. Stack blocks for a taller snowman. These are sturdy and make great gifts.
14. Knitted Christmas Stockings

Knitting a stocking feels so rewarding. You create a cozy, handmade piece for your fireplace. I love filling mine with treats.
- Materials: Yarn, knitting needles, pattern.
- Time: 4–6 hours.
- Skill Level: Advanced.
- Use: Functional decor, gifts.
Follow a simple stocking pattern. Knit with red and white yarn for a classic look. Sew the pieces together. Add a loop for hanging. If knitting feels tough, try a smaller size. These stockings are heirlooms in the making.
15. Cinnamon Stick Ornaments

Cinnamon stick ornaments smell amazing. You tie them into bundles and add ribbons. I hang these on my tree for a rustic, scented touch.
- Materials: Cinnamon sticks, ribbon, beads, glue.
- Time: 30 minutes.
- Skill Level: Beginner.
- Use: Tree decor, aromatic gifts.
Glue three cinnamon sticks together. Tie with ribbon and add beads. Hang with a loop of ribbon. These are quick and fill your home with a warm holiday scent.
Tips for Success
Customization Ideas
Make these crafts your own. Add names to ornaments for a personal touch. Use your favorite colors or themes, like blue and silver for a wintery vibe. You can adapt these for other holidays too. Snowflakes work for winter solstice, and wreaths can stay up for New Year’s. Get creative and have fun.
Time Management
Plan your crafting time. Simple projects like snowflakes are great for quick sessions. Save longer ones, like stockings, for a cozy weekend. If you’re crafting with a group, assign tasks to keep things moving. I like setting up a crafting station with all supplies ready to go.
Troubleshooting Common Issues
Mistakes happen, but they’re easy to fix. If glue spills, wipe it quickly with a damp cloth. Uneven cuts? Trim carefully or cover with decorations. Paint smudges can be fixed with a small brush. If you’re missing materials, get creative. Use string instead of ribbon or buttons instead of beads. Keep it simple and enjoy the process.
Conclusion
These 15 Christmas crafts bring so much to your holiday season. From simple snowflakes to intricate stockings, there’s something for everyone.
You’ll save money, create memories, and fill your home with festive charm. Pick a craft, gather your supplies, and start creating. Share your projects online or gift them to loved ones.
You’ll feel the holiday spirit in every cut, stitch, and brushstroke. For more ideas, check out craft blogs or Pinterest communities. Happy crafting!

Emily Harper is a kitchen decor expert and interior designer with a passion for creating stylish, functional spaces. As a busy mom, she understands the importance of a kitchen that works for both family life and design. With 6 years of experience, Emily specializes in transforming kitchens into inviting, practical spaces. She’s known for her ability to blend trends with everyday needs, helping families create kitchens that feel like the heart of the home.